Add JitPack in your project's gradle file :
  allprojects {
    repositories {
      ...
      maven { url 'https://jitpack.io' }
    }
  }
Then add the Verloop's dependency in your app's gradle file
  dependencies {
          implementation 'com.github.verloop:android-sdk:1.1.15'
  }
-keepattributes *Annotation*
In your MainActivity (or any of the activity), you need to initialize an object of Verloopclass.
It accepts a VerloopConfig object as an argument for initializing.
// Exhaustive list of values which you can put while creating config
var config = VerloopConfig.Builder()
    .clientId("CLIENT_ID")              // Required: this would be your account name associated with verloop. eg: <client_id>.verloop.io
    .userId("USER_ID")                  // If user is logged in, and if you want to associate older chats, else, skip this for anonymous user
    .fcmToken("FCMTOKEN_FOR_DEVICE")    // If you wish to get notifications, else, skip this
    .recipeId("RECIPE_ID")              // In case you want to use default recipe, skip this
    .userName("USER_NAME")              // If guest name variable is a part of the recipe, or the value is not required, skip this
    .userEmail("USER_EMAIL")            // If email variable is a part of the recipe, or the value is not required, skip this
    .userPhone("USER_PHONE")            // If phone variable is a part of the recipe, or the value is not required, skip this
    .isStaging(false)                   // Keep this as true if you want to access <client_id>.stage.verloop.io account. If the account doesn't exist, keep it as false or skip it
    .closeExistingChat(false)           // Close the existing chat if exist and start a new conversation
    .fields(customFields)               // These are predefined variables added on room level or user level
    .overrideHeaderLayout(false)        // Use toolbar_verloop.xml from parent project to set custom header. Can't use along with headerConfig
    .headerConfig(headerConfig)         // Configuration to customize toolbar. Can't use along with overrideHeaderLayout
    .allowFileDownload(true)            // This will allow visitors to download the attachments. If this is false, download button will not be visible on the attachment
    .build()                            // this would build the final config object which is later used by Verloop object to star the chat

val verloop = Verloop(this, config)     // `this` here refers to an activity context.
If you don't have a user ID, or have an anonymous user, simply leave the field and our SDK will take care of it.
val config = VerloopConfig.Builder()("YOUR-CLIENT-ID").build()And when the user clicks on "Support" button, you simply need to call
verloop.showChat()and the chat activity will start.
To set a user properties name, email, and phone, you can directly call the method
in VerloopConfig object.
config.userName("Name").build()
config.userEmail("Email").build()
config.userPhone("Phone").build()Default recipe will run during the conversation unless we do a manual recipe override by calling the following method:
config.recipeId("<Recipe ID>").build()You can send custom details of a customer with conversation scope or at global scope.
Custom fields set on the conversation scope will have context associated with only that particular conversation. Once the conversation is over, you can set different values for a new conversation for the same customer. Use the following code to set the value:
config.putCustomField("Test Field", "Test Value")OR
config.putCustomField("Test Field", "Test Value", Scope.ROOM)Global scope variables are associated with customer and not on a conversation. Something like name, email etc. do not change on different conversation of the same user. To set the value for global scope variables:
config.putCustomField("Test Field", "Test Value", Scope.USER)There are two way to customize toolbar. In VerloopConfig you can either use overrideHeaderLayout or headerConfig.
How to use overrideHeaderLayout:
In root project you can create a new layout resource file named as 'toolbar_verloop.xml' to override toolbar layout defined in the sdk.
- Set overrideHeaderLayout to true in VerloopConfig
- Set headerConfig to false in VerloopConfig (by default is false)
- Create toolbar_verloop.xml in root project layout folder
- Customize the views in toolbar_verloop.xml as required.
- If exists, set back navigation icon id to 'verloop_back_icon' in toolbar_verloop.xml Notes: Both overrideHeaderLayout and headerConfig cannot be used together.
How to use headerConfig:
- Create an object of HeaderConfig with required configuration
- Set headerConfig in VerloopConfig
- Set overrideHeaderLayout to false in VerloopConfig
val headerConfig = HeaderConfig.Builder()
    .brandLogo("https://logo-url")
    .title("Verloop")
    .titleColor("#FFFFFF")
    .titlePosition(Position.LEFT)
    .titleFontSize(18.0f)
    .subtitle("Support automation")
    .subtitleColor("#FFFFFF")
    .subtitlePosition(Position.LEFT)
    .subtitleFontSize(12.0f)
    .backgroundColor("#d451db")
    .build()

val verloopConfig = VerloopConfig.Builder()
    .clientId("client_id")
    .overrideHeaderLayout(false)
    .headerConfig(headerConfig)
    .fields(customFields)
.build()This will work only after you have added FCM token at the time of creation of the verloop config object
config.fcmToken("FCMTOKEN-FOR-DEVICE").build()Now, to let Verloop handle Notifications, simply add this line in your FirebaseMessagingService
class
@Override
fun onMessageReceived(remoteMessage: RemoteMessage) {
    // set a drawable to use as icon for notifications
    val icon = R.drawable.notification_image

    // Notifications will be auto-ignored if it's not from Verloop. Default notification channel name will be "Verloop Chat Message"
    VerloopNotification.showNotification(
        this,
        icon,
        remoteMessage.getData(),
        "Your Notification Channel Name"
    )

    // Do anything else with your message.
}In your Launcher activity override onCreate and onNewIntent as given below.
override fun onCreate(savedInstanceState: Bundle?) {
    super.onCreate(savedInstanceState)
    setContentView(R.layout.activity_test)
    // ...
    if (intent != null) {
        onNewIntent(intent)
    }
    // ...
}

override fun onNewIntent(intent: Intent?) {
    super.onNewIntent(intent)
    if (intent != null && intent.extras != null && intent.extras?.containsKey("verloop") == true) {
        val json = intent.extras?.getString("verloop")
        try {
            val jsonObject = JSONObject(json)
            if (jsonObject.has("client_id")) {
                var clientId = jsonObject.getString("client_id")
                if (clientId != null) {
                    var config = VerloopConfig.Builder().clientId(clientId).build()
                    Verloop(this, config).showChat()
                }
            }
        } catch (e: JSONException) {
            Log.e(TAG, e.message.toString())
        }
    }
}
At the time of having the conversation, bot shows button for faster replies. Button click listeners can be added using:
config?.setButtonClickListener(object : LiveChatButtonClickListener {
    override fun buttonClicked(title: String?, type: String?, payload: String?) {
        // Add the app logic for button click
    }
})If the user clicks on any URL provided by the bot or by the agent, then you can listen to the URL
and take the action in the app. Actions can be like re-routing based on the product link etc. URL
click listeners can be added using:
overrideUrlClick: keep it as true if you want to handle the url internally in your app. Else keep
it false if you want to open a browser when url is clicked.
config?.setUrlClickListener(object : LiveChatUrlClickListener {
    override fun buttonClicked(url: String?) {
        // Add the app logic for url click
    }
}, overrideUrlClick)When the user logs out of your app, make sure to call
verloop.logout()Notification Approval on Verloop.io Platform
In order to receive notification on the client’s mobile app using our SDK integration, the following details
- Go to Settings > Chat > Android SDK
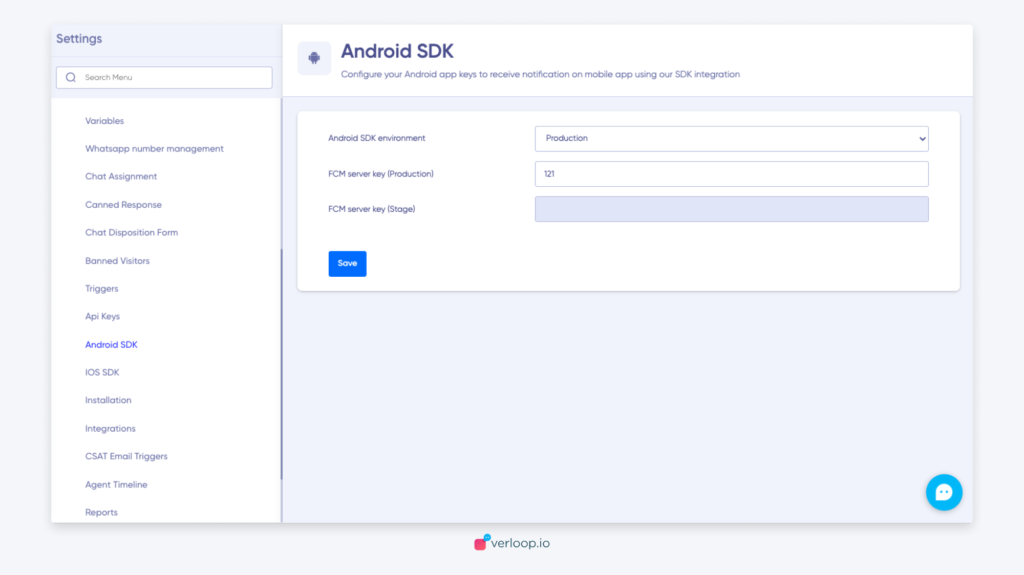
- Add the FCM server key (Stage) sent to you
- Click on Save