WhatsApp Business Solution Providers (BSPs) like Verloop.io use embedded signup to onboard businesses from their website to the WhatsApp Business Platform and allow you to create your own WhatsApp Business account through the embedded sign-up process.
As a Business Solution Provider (BSP), Verloop.io will undertake the following tasks after the sign-up process:
- Create a WhatsApp Business account for you in our Meta Business Manager.
- Offer you the WhatsApp Business Platform Cloud API hosted by Meta.
- Provide technical integration of the WhatsApp Business platform.
- Manage your WhatsApp Business account.
Embedded signup significantly reduces onboarding time, making it easier for you to scale with the WhatsApp Business Platform.
Flow for Embedded Sign-up to Create a WABA with Verloop.io BSP
To create a WhatsApp Business account using Meta’s embedded signup, clients can follow these steps:
1. Click on “Log in with Facebook.”
Log in to their existing personal Facebook account. Note that new personal accounts may not be approved.
2. Link an existing Facebook business account or create a new one.
This business account will be associated with the WhatsApp Business account.
3. Provide the legal business information.
4. Create or link a WhatsApp Business profile, including the display name, category, and business description to share with customers.
5. Generate a new WhatsApp Business number that has not been used on WhatsApp or WhatsApp Business apps before. A code will be sent via text message to verify the phone number.
The New Embedded Signup Flow:
The new embedded signup flow has the following features:
1. Business Selection:
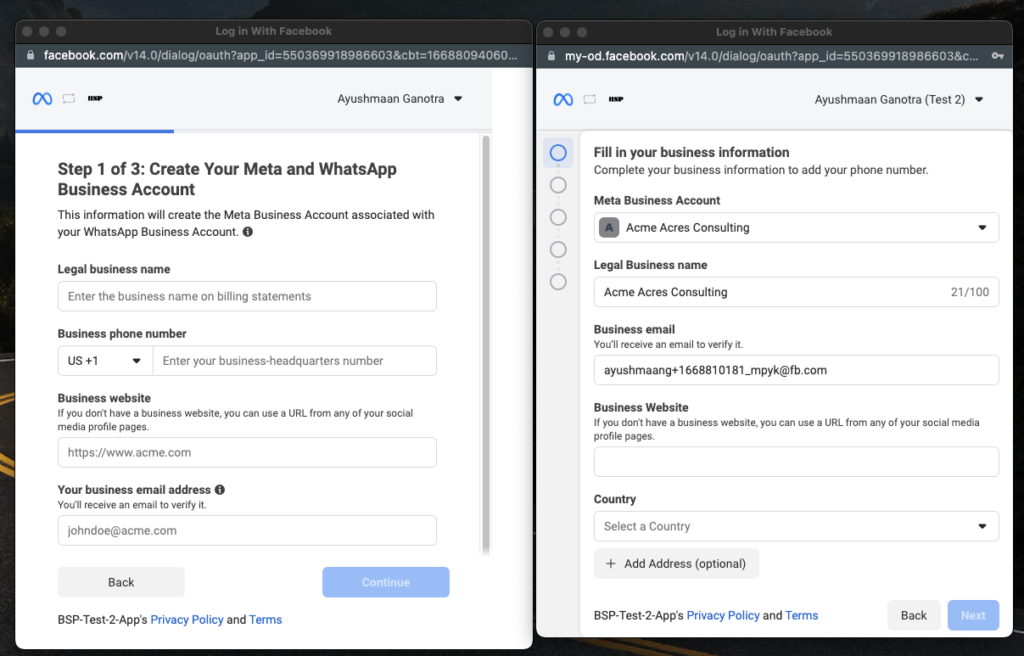
- The new flow shows the default legal name as the business and always displays the business information even if all of the required fields are filled out.
- Businesses, where the user is not an admin and those that have reached the maximum amount of businesses created will be disabled.
2. WABA and Profile Selection:
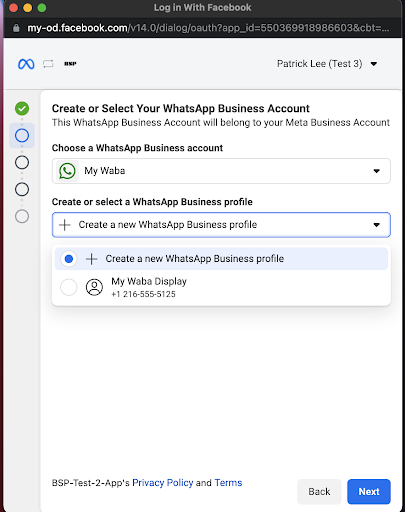
In the new flow, the process for adding or selecting a new WABA/phone profile is standardized, and the same for both scenarios. From this screen, users have the following options:
- Create a new WABA and profile
- Select an existing WABA and create a new profile
- Select an existing WABA and profile
The flow will always begin similarly regardless of which option the user selects.
3. Creating a New WABA and Profile
If the user decides to create a new WABA and profile, they must complete all the necessary WABA and profile details on a single page.
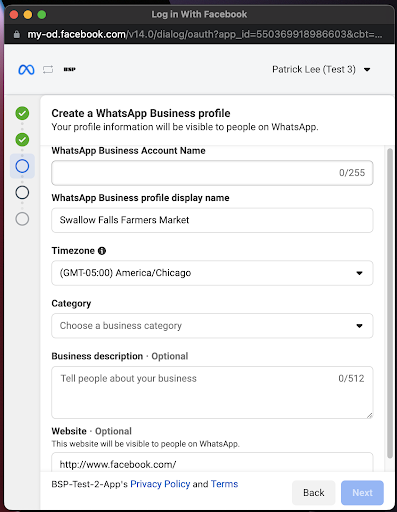
The website field is now optional and automatically filled with the business’s website when creating a new WABA and profile.
4. Selecting an Existing WABA and Creating a New Profile
When selecting an existing WABA, the user is only able to edit the phone profile field.
If the user chooses an existing WABA and profile, the profile will be displayed but cannot be edited from this page. To edit the profile, the user must go to the WhatsApp Manager.
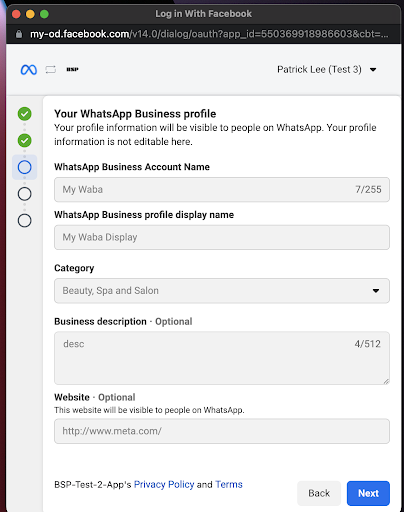
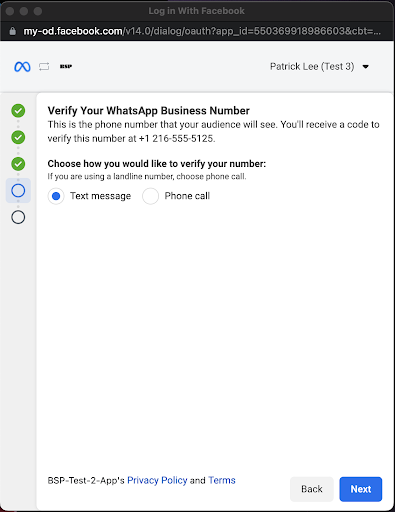
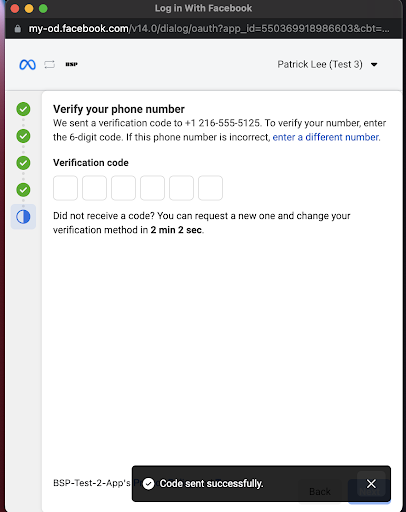
The user will then be able to verify the phone number and select the preferred verification method.
5. Verified Phone Number
Once the user selects a verified phone number, they will be automatically directed to the completion step.

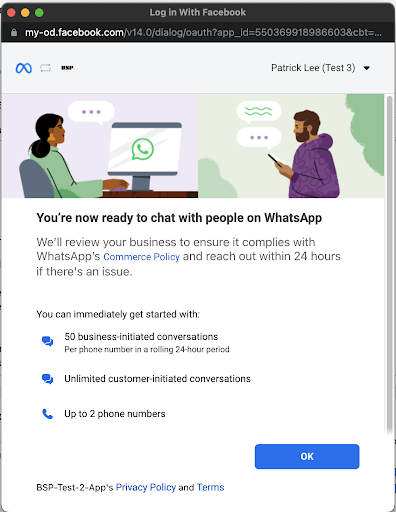
Next Steps
After successfully completing the sign-up process, the admin will be redirected to Verloop.io’s WABA integration board. Users will be logged out of the Facebook page, ,
If the embedded sign-up flow breaks, the user will be redirected to the WABA integration board and can use the “Add new number” button again. An error message will be displayed, saying, “WABA Integration Failed. Try again.”
The user will be prompted to choose the WABA ID noted earlier or the ID they want to connect to the existing Verloop.io client ID from a list of WABA IDs linked to the FB Business manager ID. Once the WABA ID is confirmed, we will make an API call, retrieve all the phone numbers linked to the provided WABA ID and add them to our board.
The client can then see a list of all the phone numbers linked under the WABA ID, with columns mentioned in section 7. A “Numbers added” system message is shown to the admin.
Each number needs to be registered with Verloop.io, and Verloop.io will generate a phone number ID against each added number if it is not verified yet. The client will then be asked to verify the number through a voice call or SMS. A live timer countdown is shown as per the meta API.
If the verification status is “verified,” we do not have to show the “verify number” interaction. Verloop.io will then confirm the number after checking the verification status. After the verification, we can make an API call and retrieve all the necessary data against the phone number.
Watch this video for more information – How to use embedded signup to onboard clients to the WhatsApp Business API
For any more queries, contact us at support@verloop.io
