What is API?
API, or Application Programming Interface, is a set of protocols that enables different software systems to communicate and exchange data. It allows applications to access features or data from external services, enabling seamless interaction and integration across platforms.
Verloop.io’s API Block
The API Block in Verloop.io is a powerful tool that allows your chatbot to interact with external APIs. This block enables your bot to retrieve, send, and manipulate data from third-party services, enriching the conversation with dynamic, real-time information. In this document, you will learn how you can set it up and use it effectively.
10 Essential API Terminologies
It’s important to understand some key terms that will help you navigate API interactions before diving deeper into using APIs. Here are 10 fundamental concepts every beginner should know:
- Requests and Responses: An API works like a conversation. When you ask for data (request), the API responds with the information (response) or notifies you if something went wrong. Think of it as placing an order at a restaurant – you ask for something, and the server either brings it or explains why they can’t.
- REST (Representational State Transfer): REST is a set of guidelines for building efficient web services. It’s like a code of conduct for how requests and responses should be handled over the web, ensuring smooth and organized communication.
- HTTP Methods: These are commands that tell the API what action you want to perform. Common methods include:
- GET: Retrieve data.
- POST: Send new data.
- PUT: Update existing data.
- DELETE: Remove data. They function like verbs in a sentence, directing the action you want to take with the data.
- Endpoints: An endpoint is a specific URL where the API can access resources. Think of it as a doorway that leads to the data or service you want to interact with, each endpoint serving a different purpose.
- API Documentation: Just like a user manual, API documentation tells you how to interact with the API. It provides details on what requests you can make, the format to use, and the responses you can expect.
- API Calls: An API call is simply the act of sending a request to an API. It’s like making a phone call to retrieve information or perform an action, with each call representing a communication attempt.
- Payloads: The payload is the actual data being sent or received in an API call. Similar to the contents of a package, it represents the key information you are sending to or receiving from the API.
- Response Codes: Response codes are status messages from the API, indicating whether your request was successful or not. For example:
- 200: Success.
- 404: Not found.
- 500: Server error. They function like feedback on how well your request was processed.
- Headers: Headers carry additional information with API requests or responses, such as content type or authentication details. They work like the address on an envelope, guiding how the message should be handled.
- Authentication: This process verifies your identity before accessing an API. It’s like showing a badge to prove you’re allowed to enter a restricted area, ensuring only authorized users can interact with the system.
Understanding these basic terms will help you better grasp how APIs work and how to use them efficiently.
What Are The Components of The API Block?
Before diving into the detailed setup, it’s helpful to understand the key components of the API Block in Verloop.io:
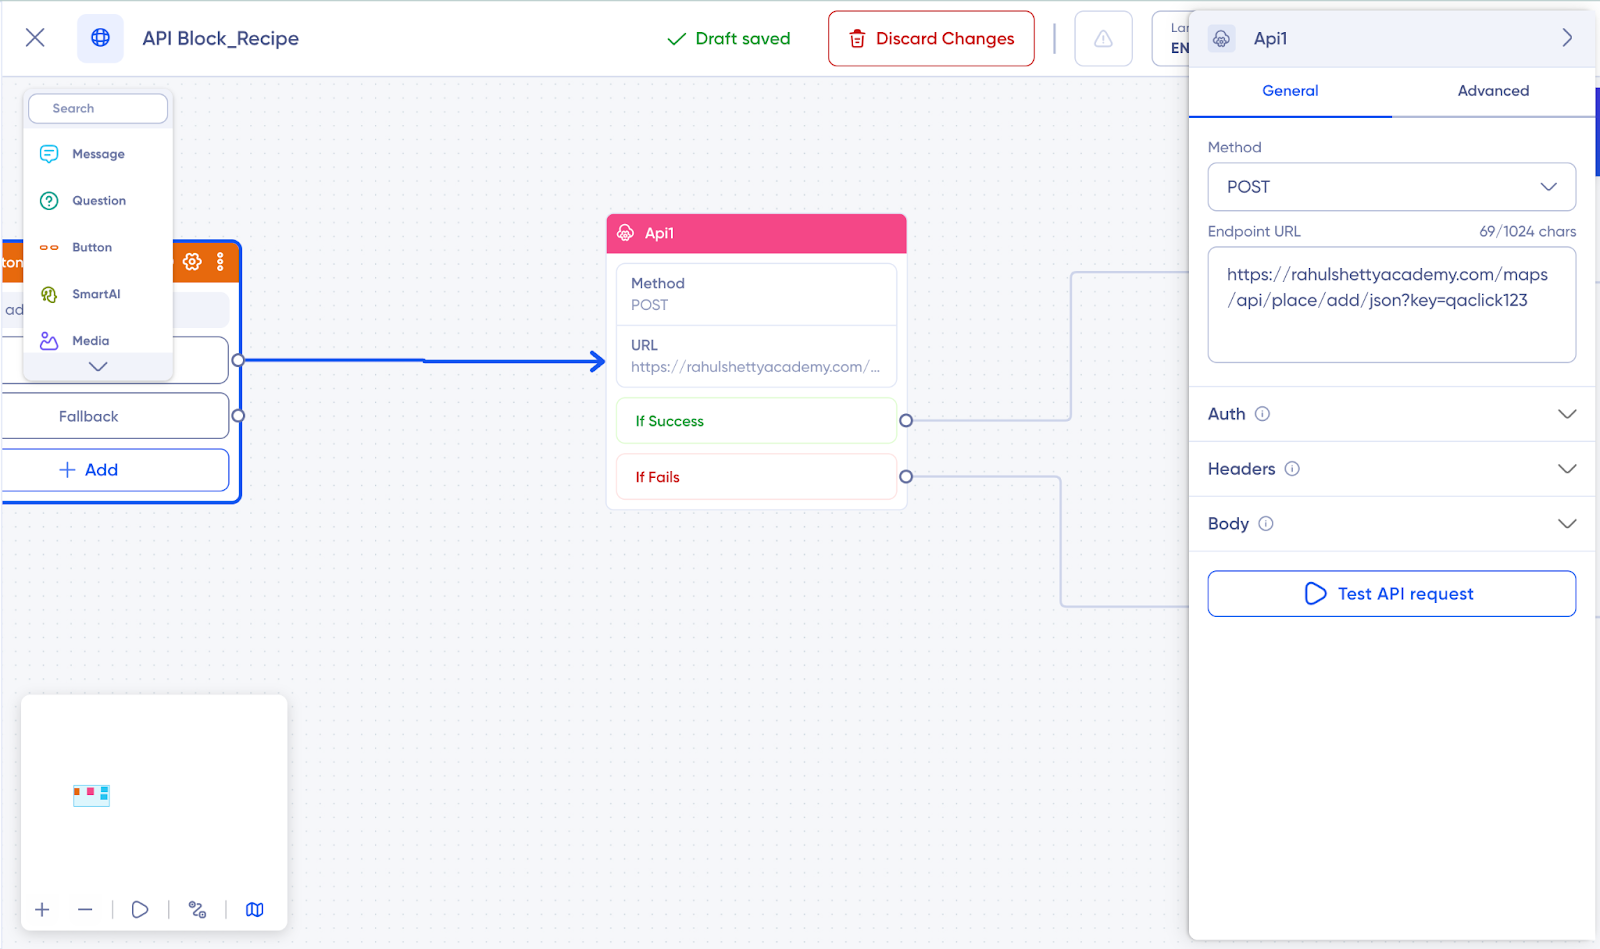
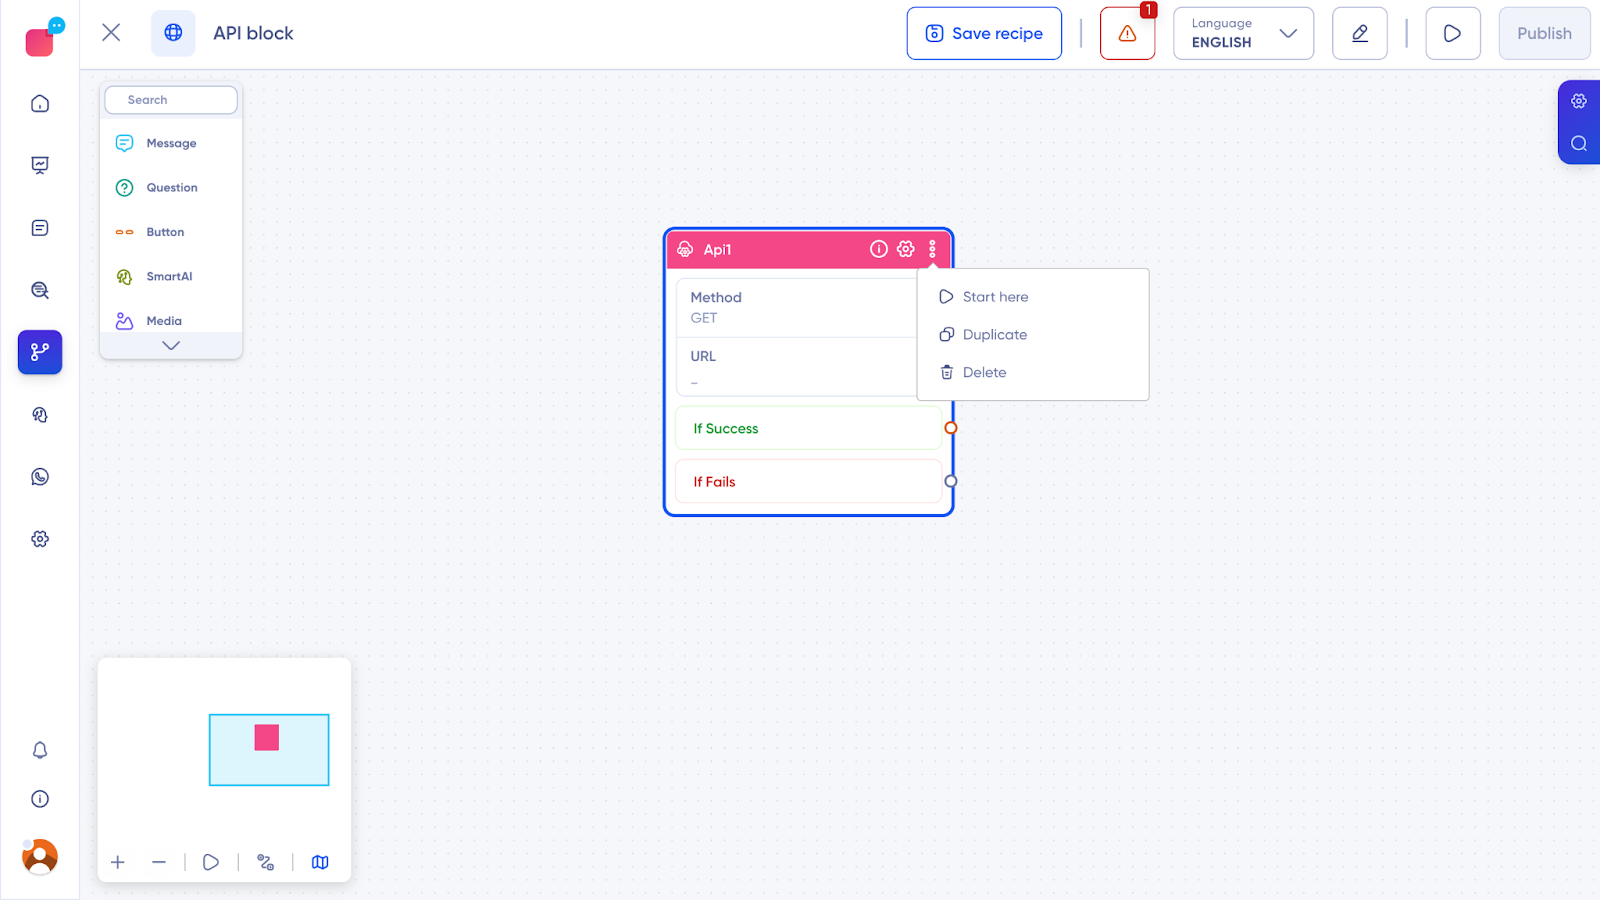
- Input and Output Nodes: Allow data to flow in and out of the block. The output node has two paths, “If Success” and “If Fails,” based on the API response.
- Placeholders for API Details: Fields where you can add the API endpoint, headers, parameters, and body content.
- Settings:
- General: Basic settings like selecting the HTTP method and adding the endpoint URL.
- Advanced: For configuring timeout and retry on failure.
- Info Icon: Provides a description of the block for better understanding.
- Three Dots Menu: Offers options to duplicate, delete, or mark this block as the starting point of the recipe.
Adding the API Block
- Locate the API Block in Bot Builder: In the bot builder, find the API Block from the available options and drag it into your flow.
- Position in Flow: Place the block where you want the API interaction to occur within your chatbot’s journey.
Configuring the API Request
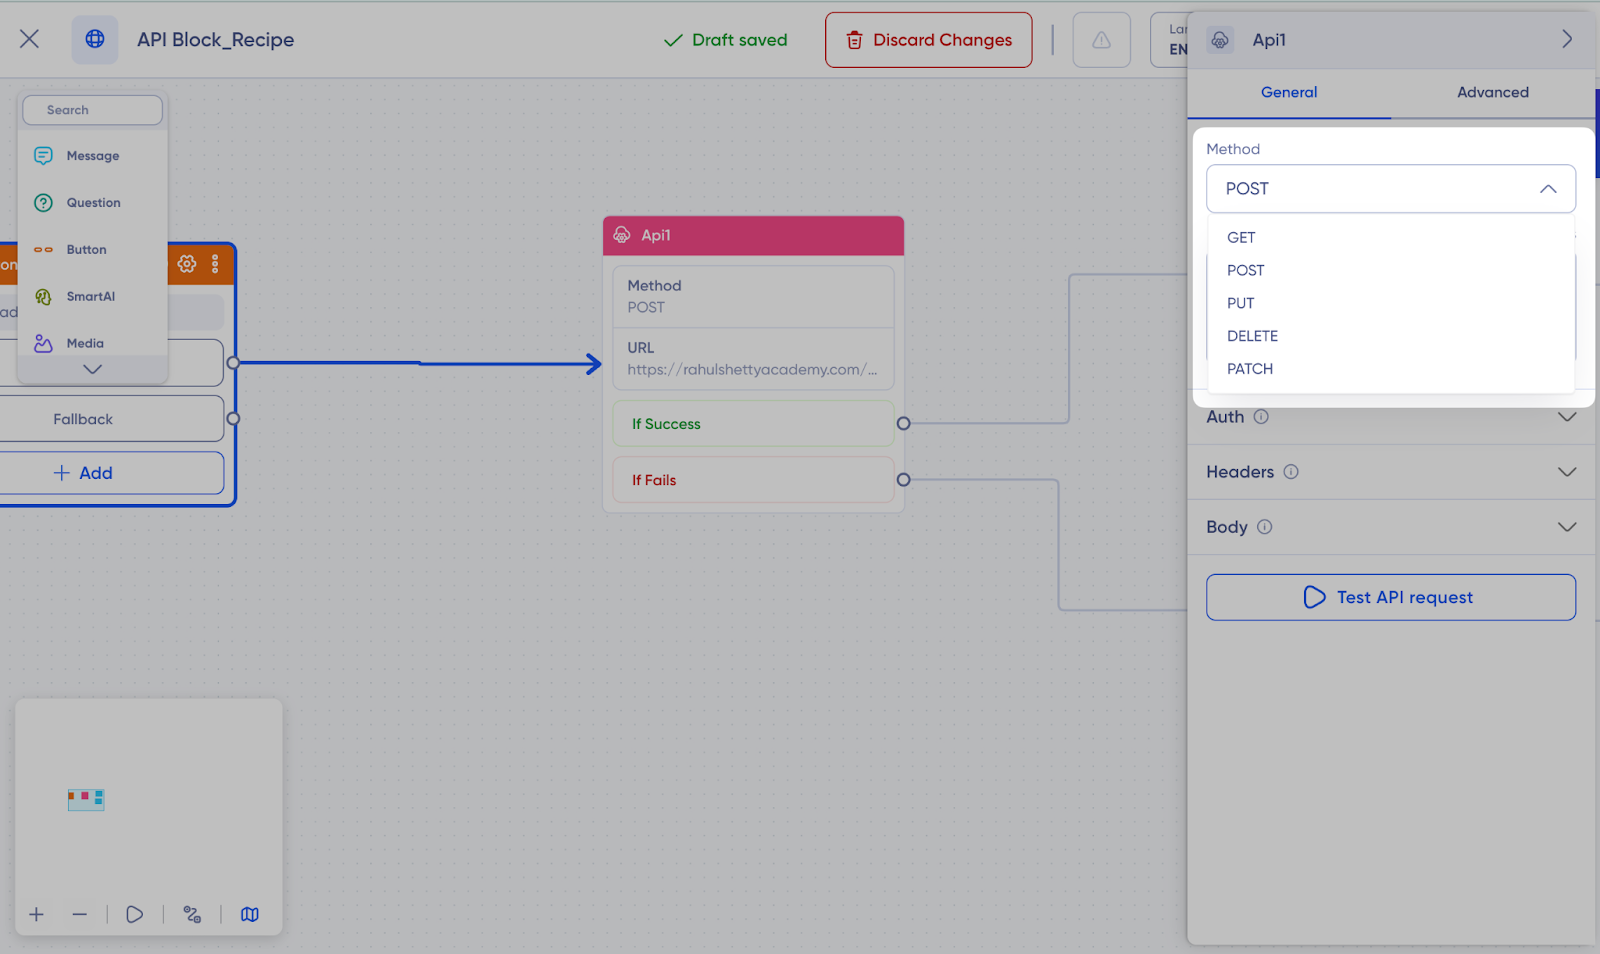
- Select HTTP Method:
| HTTP Method | Utility |
| GET | Use this method to retrieve data from an API, like fetching user details or information. |
| POST | This is used to send data to an API, such as submitting a form or adding a new entry in a database. |
| PUT | Use this when you need to update existing data in an API, like modifying user information. |
| DELETE | This method is used to remove data from an API, such as deleting a user account. |
| PATCH | Similar to PUT, but typically used for partial updates to existing data. |
- Enter the Endpoint URL:
Ensure the URL is valid and within the 1024-character limit. If you exceed this limit, the system will return an error.
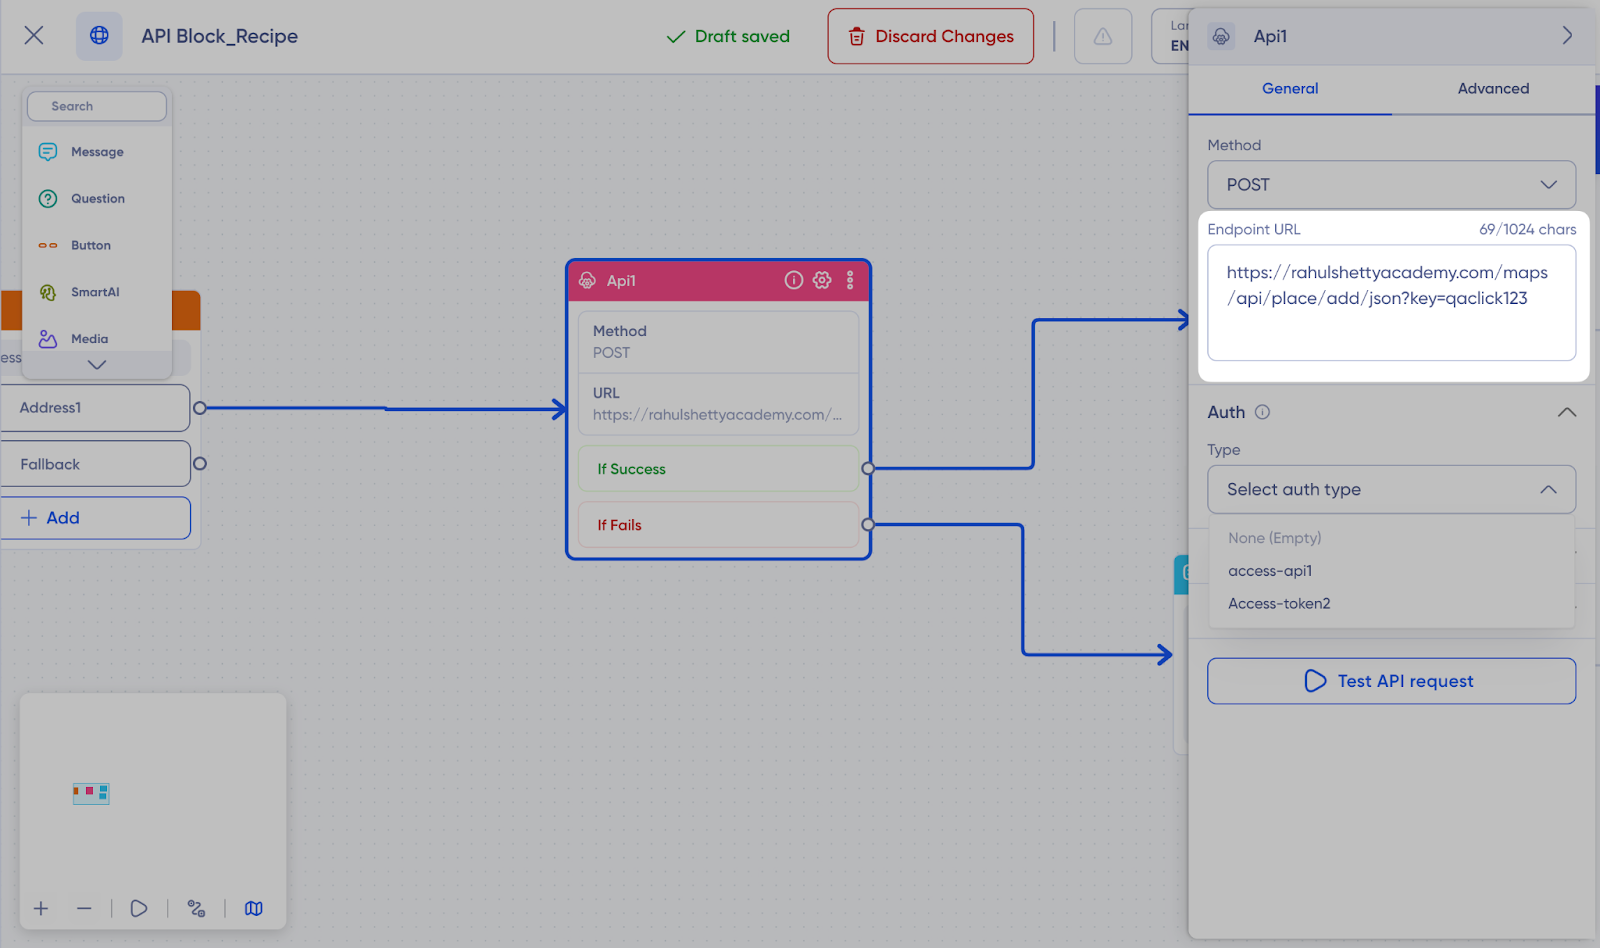
Setting Up Auth
- Auth Types: Choose the necessary type:
| Auth Types | Description |
| Basic Auth | Uses a username and password for authentication. |
| Bearer Token | A token-based authorisation for secure API requests. |
| API Key | A key-value pair used to access the API. |
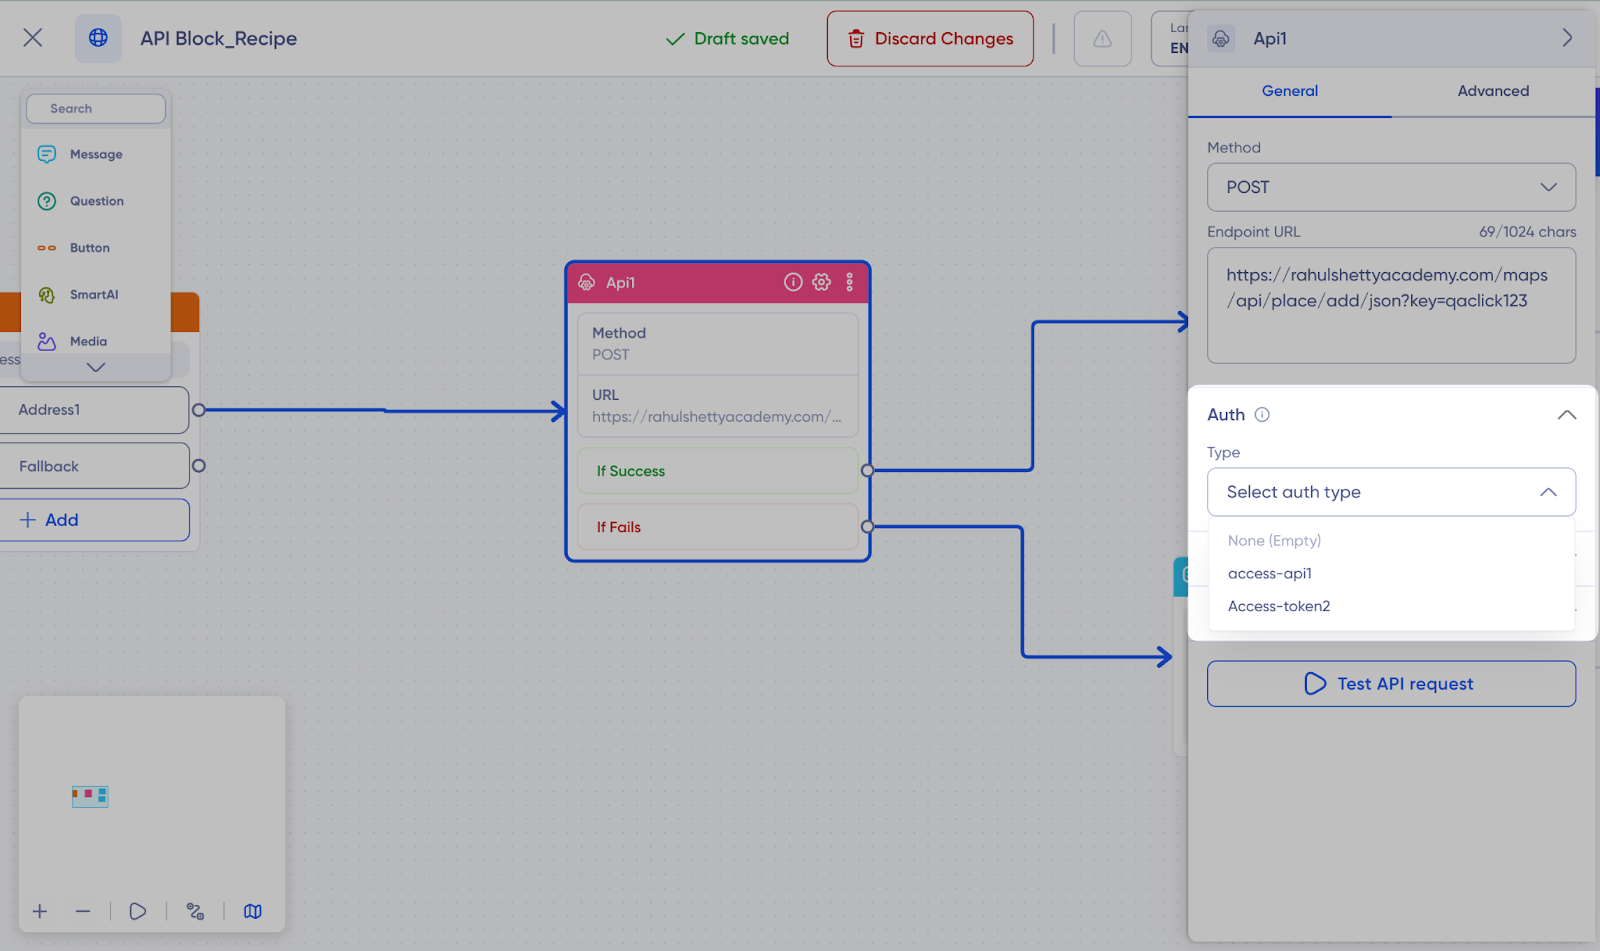
- Configuration Details: All authentication values entered are encoded and saved securely. For security reasons, these values will be hidden in future references, and while editing, the password or token values will be masked. You can add up to 20 different authentication methods.
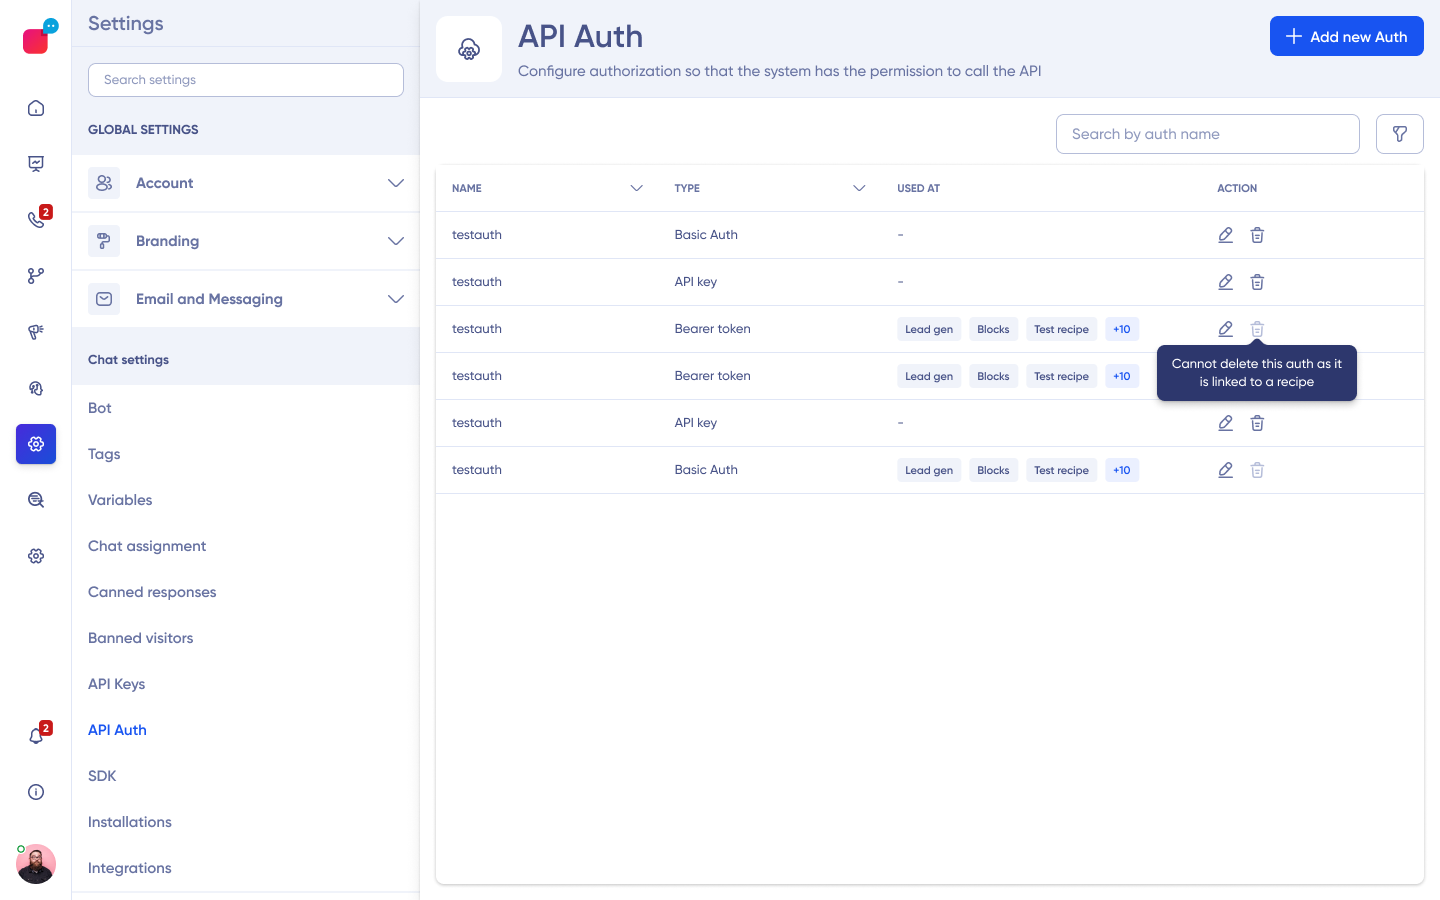
- Managing Auth: If you link an authentication to an API Block, there’s no option to delete it directly. To delete it, you must first unlink the authentication. Once unlinked, you can proceed with the deletion. This prevents accidental removal that could disrupt the entire bot flow.
Configuring Headers and Query Parameters
Headers
When setting up the API Block, you can configure headers to include essential information with your API requests.
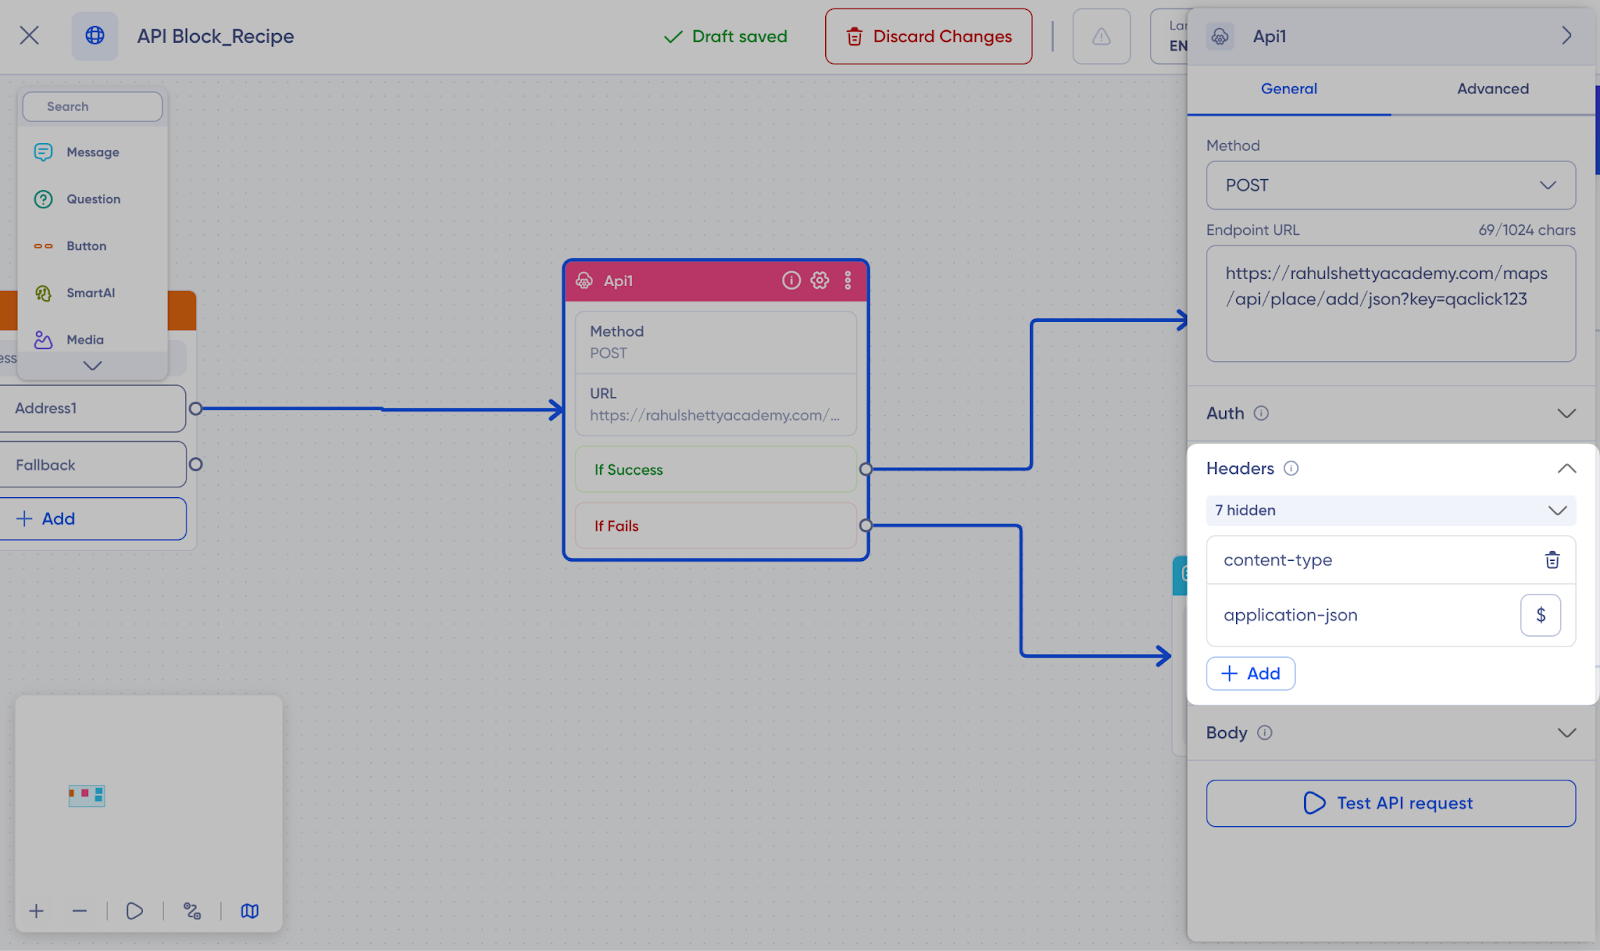
- Default Headers: The block includes some default headers such as:
| Default Headers | Description |
| Host | Specifies the domain name of the server. |
| User-Agent | Identifies the client software making the request. |
| X-Verloop-Trace-Id | Used for tracking and debugging purposes. |
| Accept | Indicates the media types the client can handle. |
| Connection | Controls whether the network connection stays open after the current transaction. |
- Optional Headers:
| Optional Headers | Description |
| Content-Type | Automatically set based on the body type chosen (e.g., JSON, form-data). |
| Content-Length | Represents the size of the request body. |
- Adding Custom Headers:
- You can add up to 30 custom headers as key-value pairs.
- Include variables in the “Value” field to make the headers dynamic, adapting based on previous user interactions.
Query Parameters
Query parameters are used to specify or filter data in your API request. Here’s how you can configure them:
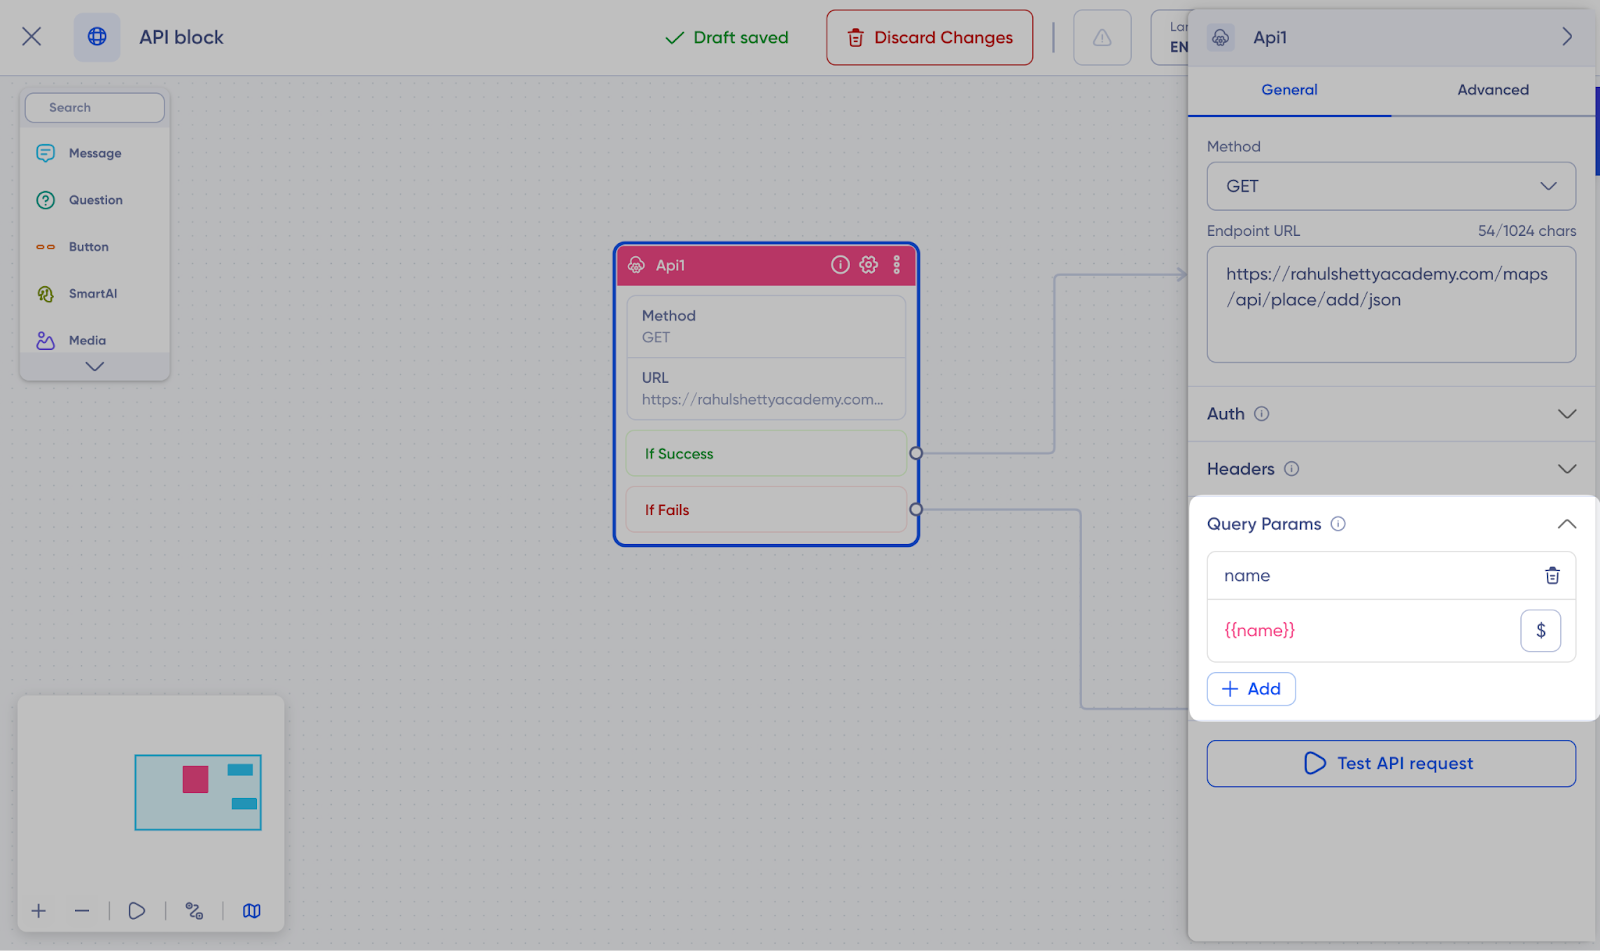
- Adding Query Parameters:
- Add up to 20 parameters as key-value pairs to customise the API request.
- Include variables in the “Value” placeholder for dynamic content.
- Each parameter you add will automatically update the URL preview, so you can see how the final request URL looks.
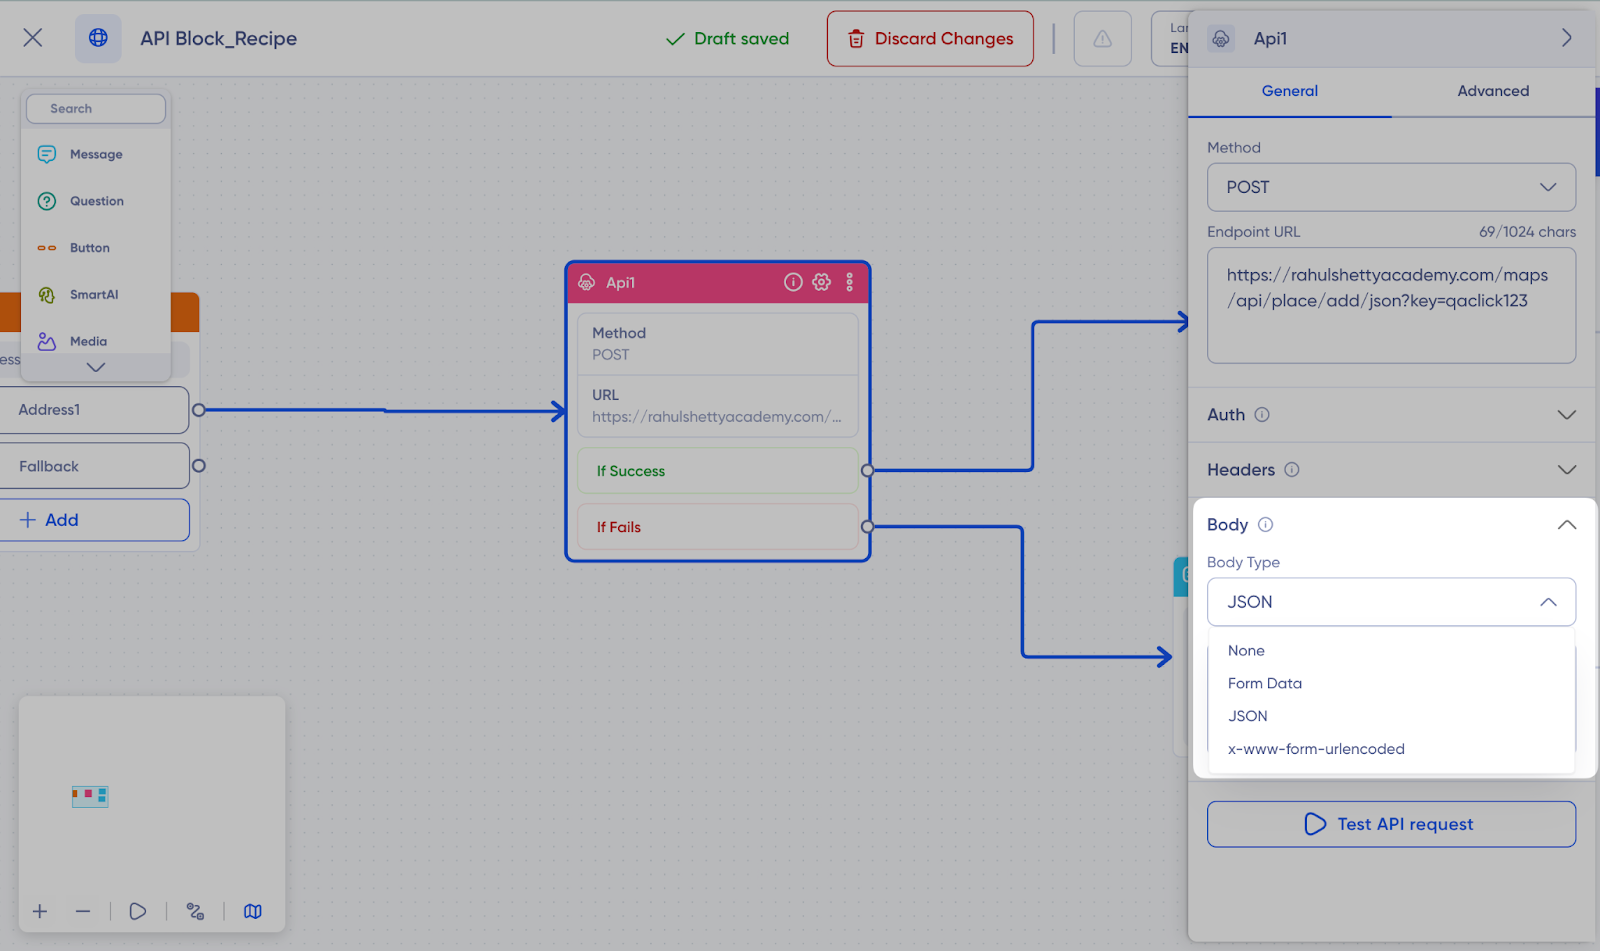
Configuring the Request Body
When setting up the API Block, you can choose the body type and content to send data to the API. Here’s how to configure it:
- Selecting the Body Type:
| Body Type | Description |
| JSON | This option provides an IDE-like editor for crafting structured JSON data. |
| Form-data | Ideal for sending data as key-value pairs, like form submissions. |
| x-www-form-urlencoded | Suitable for URL-encoded key-value pairs. |
Note: The body section is not available for GET requests since they do not send body data.
- Editing the Body Content:
- The editor changes based on the selected body type to suit the data format.
- You can insert variables directly into the body to make the content dynamic. Typing {{ will show a list of available variables to include.
- This allows you to pass data collected earlier in the conversation to the API.
- Restrictions:
- The maximum length for the body content is 2048 characters, ensuring enough space for detailed data while maintaining performance.
Testing the API Block
Testing the API Block is an essential step to ensure it interacts correctly with the external service. Here’s how to test and validate your API:
- Initiate a Test:
- Click on “Test API Request” within the API Block settings. This sends a test request to the API.
- If the API requires input parameters in the body or as query parameters, you will be prompted to enter test values for these variables.
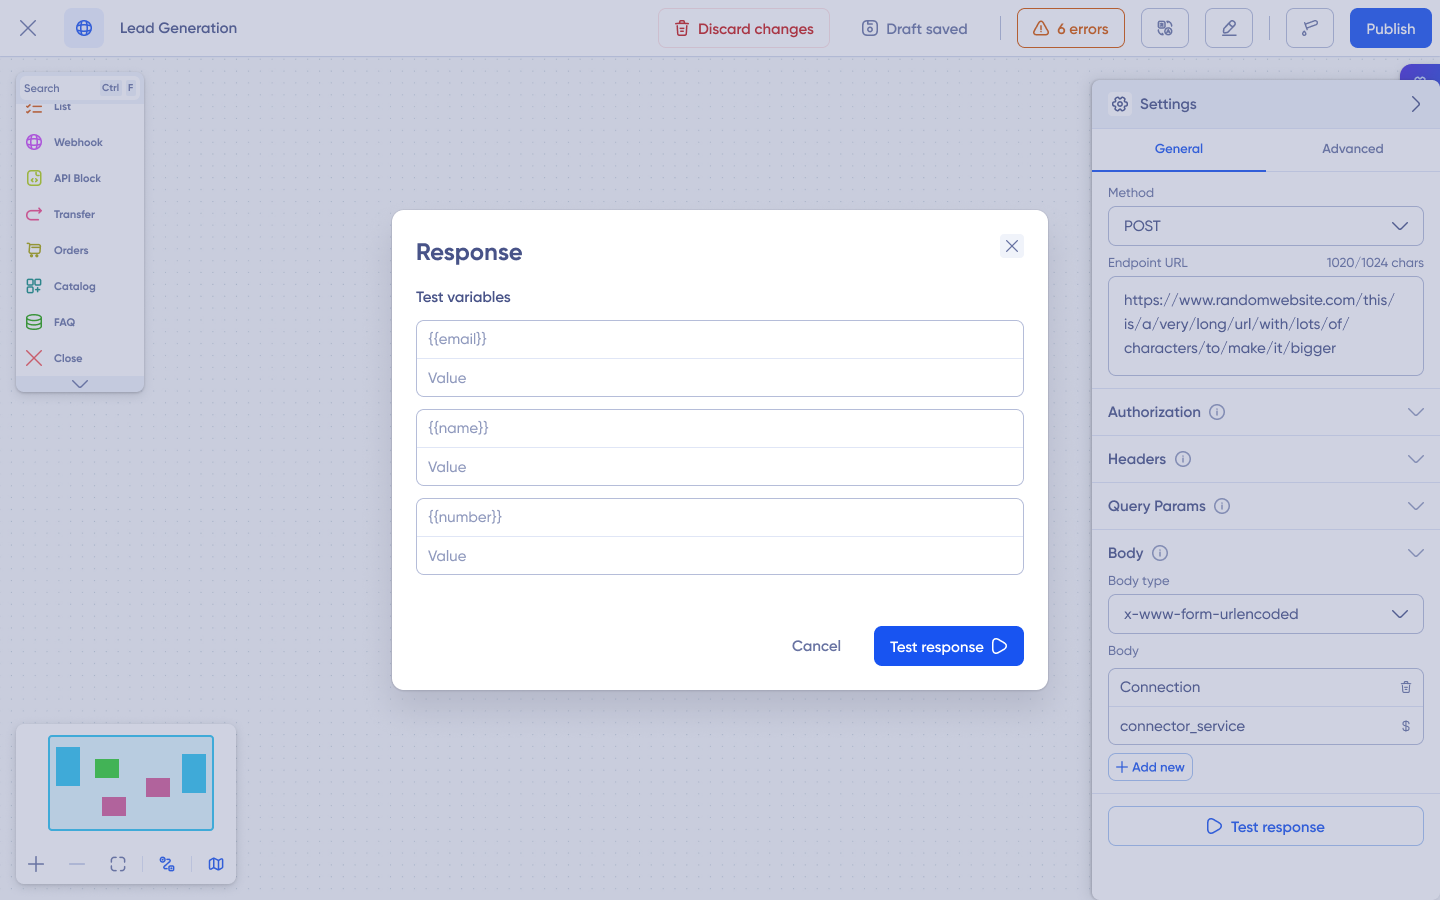
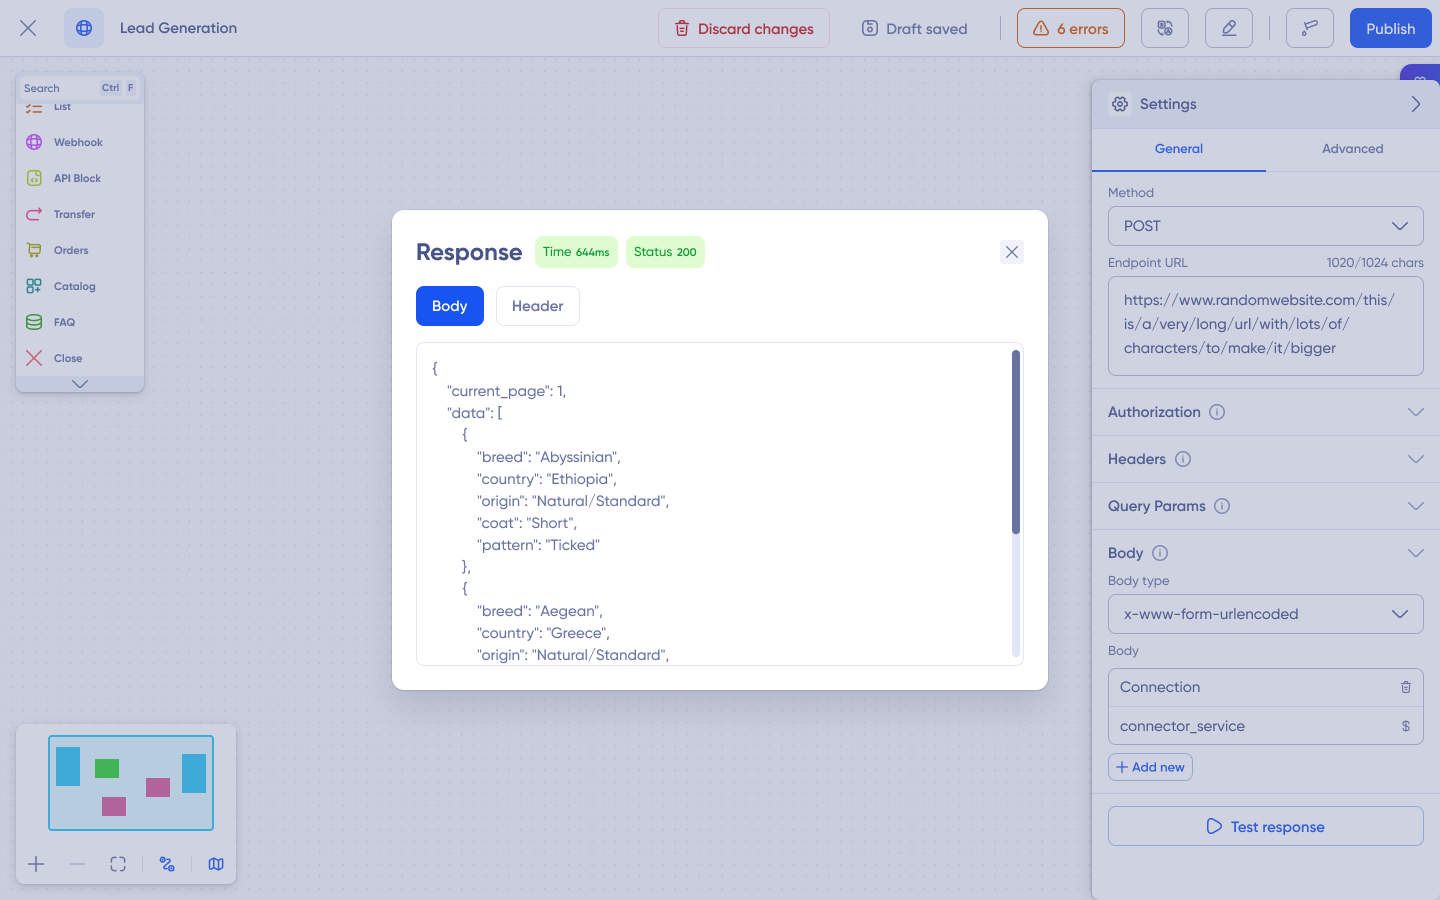
- View the Test Results:
- The test response will display the following information:
| Test Results | Description |
| Status Code | Indicates the result of the API call. |
| Response Headers | Shows any headers returned by the API. |
| Response Body | Displays the content returned by the API, which could include data or error messages. |
| Execution Time | The time taken to complete the API request, helping you gauge the API’s responsiveness. |
- Backend Routing:
- The test request is routed through our backend, ensuring it closely replicates how the API will behave in a live environment.
Saving API Responses
Once you’ve received an API response, you can save the entire response or specific parts of it into variables for use in subsequent parts of your chatbot flow. Here’s how to handle and utilise API responses effectively:
- The entire response from the API can be stored in variables for later use.
- For example, if your API block is named api1block:
- To access the status code: {{api1block.response.status_code}}
- To access a specific field in the response body, such as name: {{api1block.response.body.name}}
- To access a header value: {{api1block.response.header.name}}
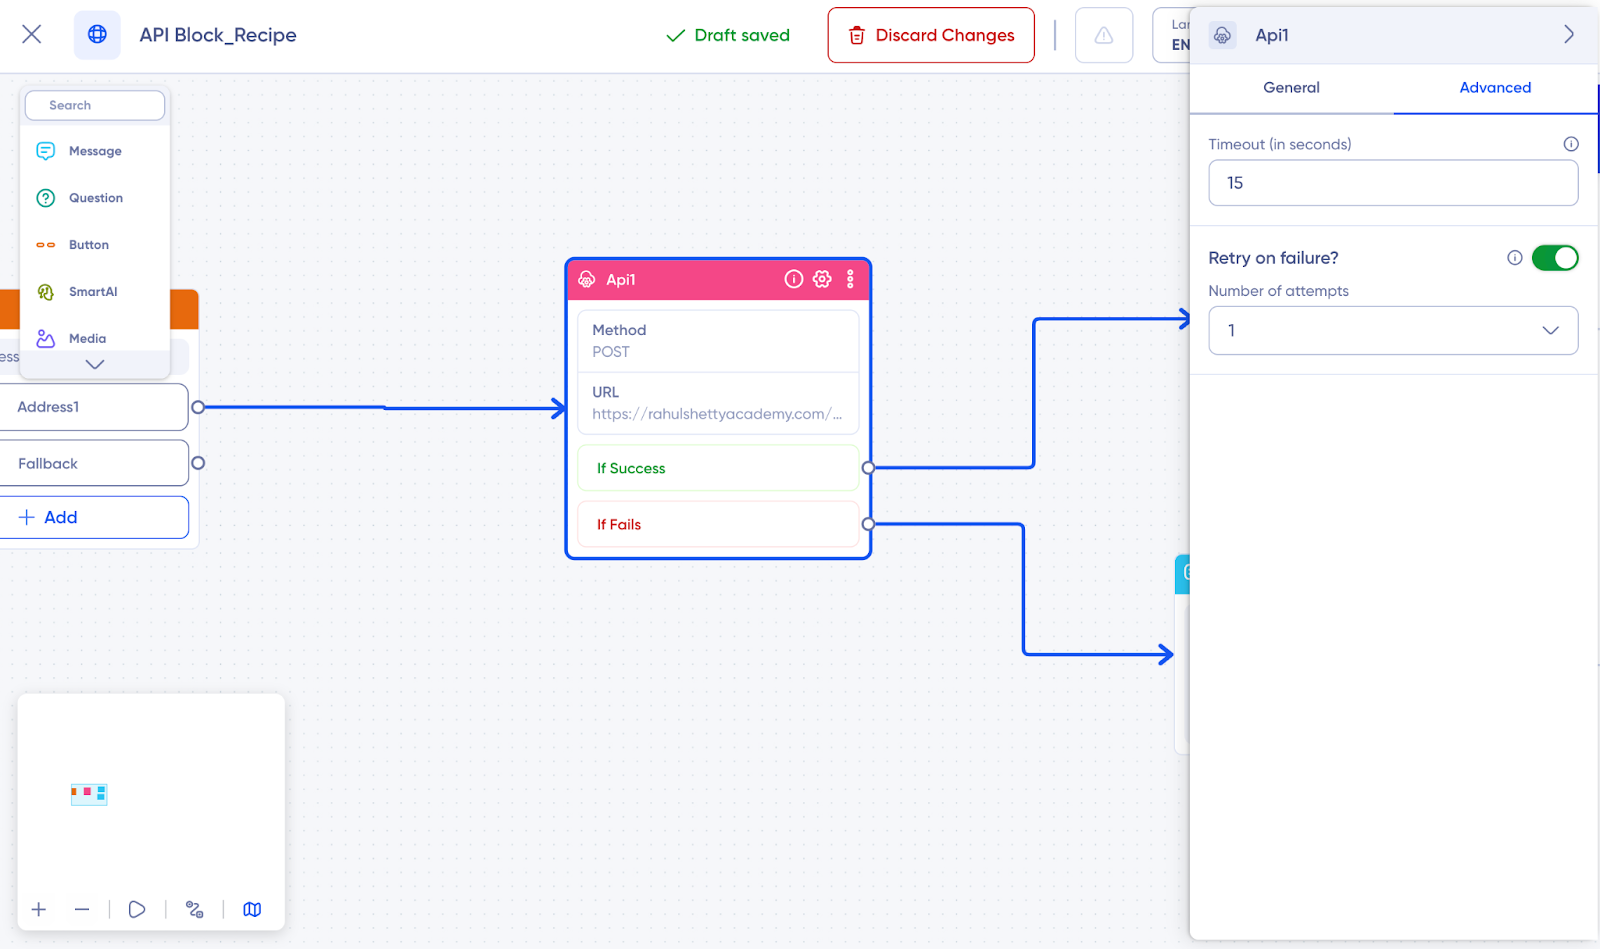
Advanced API Settings
The API Block offers several advanced settings to fine-tune how your chatbot interacts with external APIs, enhancing performance and ensuring seamless communication.
- Timeout Configuration:
- Prevent indefinite waits by setting a timeout for the API request. This helps maintain a smooth user experience.
- You can configure the timeout between 1 and 40 seconds, with the default set at 15 seconds. Adjust this based on how long you expect the API to respond.
- Retry on Failure:
- If an API call fails due to a server-side error, you can configure the block to automatically retry the request.
- The default retry count is 1, but you can set it up to a maximum of 5 retries to handle temporary issues and ensure reliability.
Utilizing the API Block in Your Bot Flow
Integrate the API Block at strategic points in your bot flow to enhance user interactions:
- Dynamic Responses: Use data retrieved from the API to provide personalised responses.
- Data Collection and Processing: Gather user inputs and send them to external systems, or retrieve information and display it within the chat.
- Complex Interactions: Combine API calls with other blocks to create complex conversational paths based on real-time data.
Best Practices
- Test Thoroughly: Always test the API block to ensure it interacts correctly with the external service and handles all possible responses.
- Error Handling: Use the output nodes (“If Success” and “If Fails”) to manage different outcomes, providing alternative paths if the API call fails.
- Keep Security in Mind: When working with sensitive data, ensure proper use of authorisation methods and handle data securely within the bot.
By following these steps, you can effectively utilise the API Block in Verloop.io to integrate external APIs into your chatbot, enhancing its capabilities with real-time data and functionality.
For further assistance or more detailed information, feel free to contact our support team at support@verloop.io.