To make adding questions and creating conversations with customers easy, the Verloop.io team has created an easy-to-use drag-and-drop bot builder to create conversation recipes’. Verloop.io’s Recipe, a.k.a the bot builder, is a set of blocks which you can drag and drop as per your need to create bot flow, through which you can carry out specific goals.
These conversations, once designed, can operate without any human intervention, help in converting the visitors of your website to a Sales Accepted Lead (SAL) and even engage your customers to resolve their queries. With Verloop’s Recipes, you can segregate, convert, filter and engage your potential leads and even resolve customers’ queries.
Right message, to the right people, at the right time.
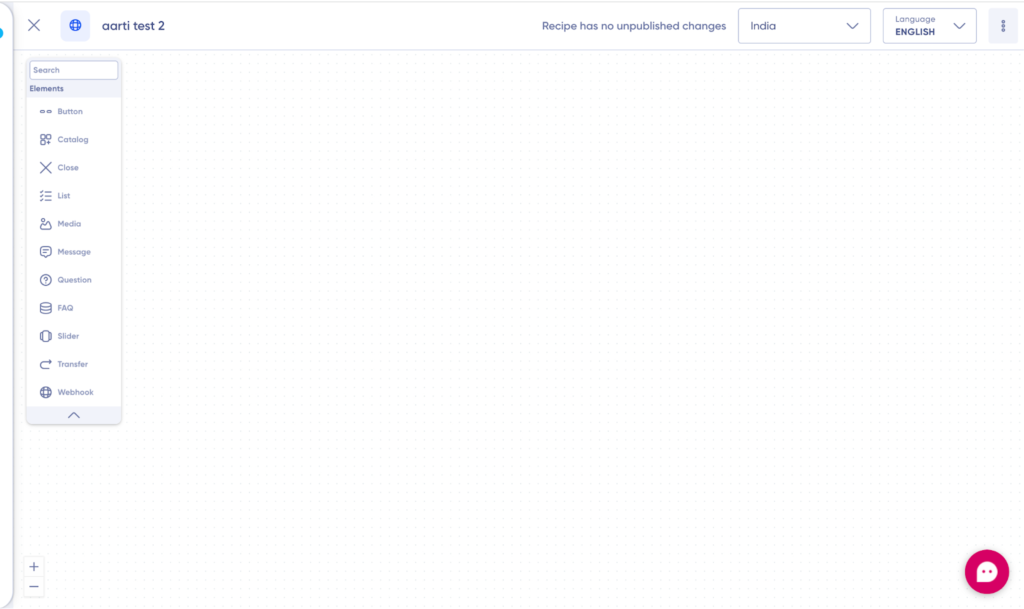
The Bot builder is divided into three sections
- Element Toolbar: Contains various blocks that you can use to create bot recipe
- Workspace: Contains a drag-and-drop workspace, which can use to create the recipes by dragging the blocks from the element toolbar.
- Header: The header contains the name of the recipe, the status of the recipe edits, the language you want to make the recipe in, the option to discard the changes made to the recipe, a button to publish the recipe, and a three-dot drop-down menu to edit the name of the recipe and general settings of the recipe.
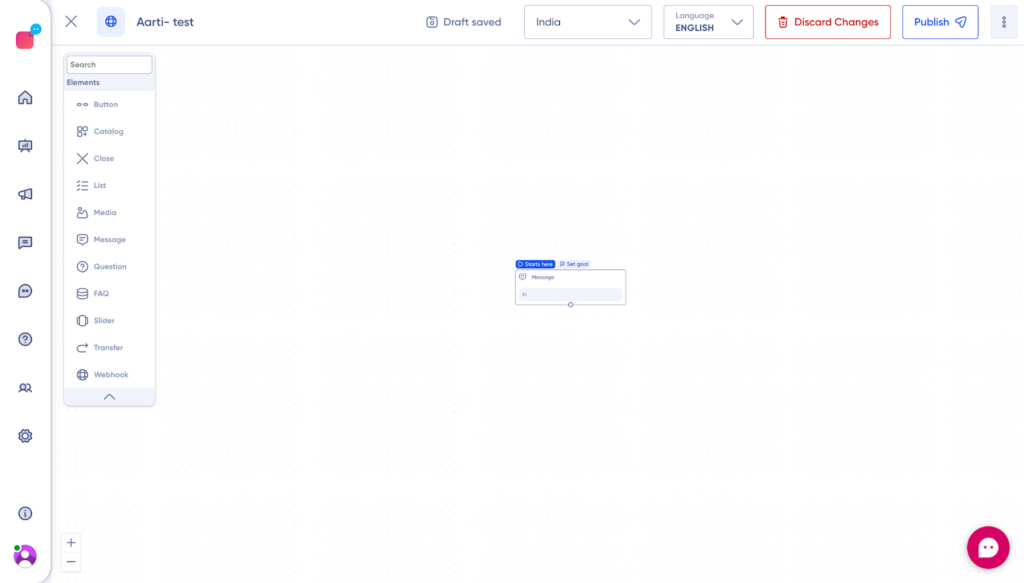
Note: You can pinch the screen to increase or decrease the size of the workspace and use left click hold and drag to move around the workspace for your convenience.
We’ll dive deep into different sections, blocks and how to build your own recipe below.
What are the different blocks available in Recipe?
Verloop.io supports the creation of different types of blocks. Each block serves a different purpose in the flow of the bot. Let’s look at them below.
1. Message Block
Use the Message block to have casual conversations with your customer. You can use this to greet/compliment/thank your customer. When the bot executes this block, it doesn’t wait for a response from the customer. The bot immediately moves to the next block.
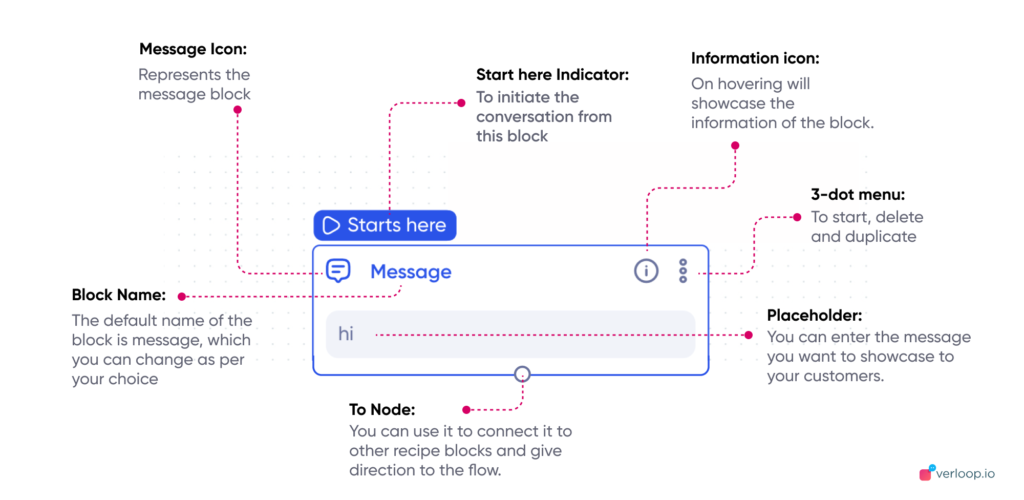
Note: You can click on the 3 dot menu on top of the block to duplicate the block.
2. Media Block
Use the Media block to send photos/videos/documents to your customers. Supported formats are png, jpeg, gif, mp4, m4v, pdf, etc. And the maximum upload size is 10MB.
Sharing actual photos, videos, gifs and documents of your products will help your customers to understand your products better. When the bot executes this block, it doesn’t wait for a response from the customer. The bot immediately moves to the next block.
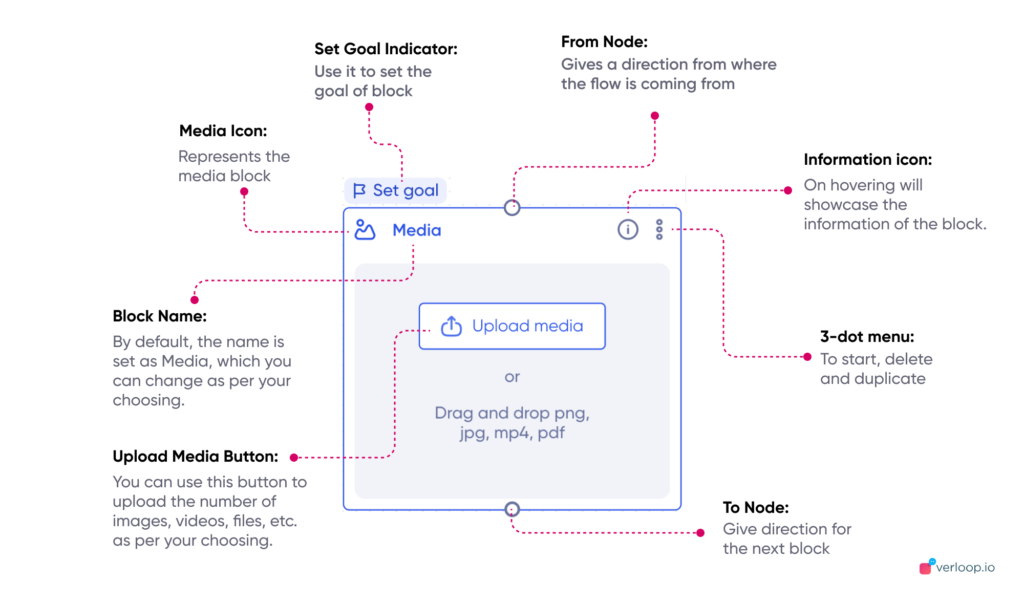
Note: You can click on the 3 dot menu to Start the bot flow from this clock, delete the block or duplicate the block.
3. Question Block
Use this block to ask a question to your visitors. You can also save the user response to a recipe variable. If you mark the question as mandatory, the bot won’t proceed to the next block until the user has given a valid answer.
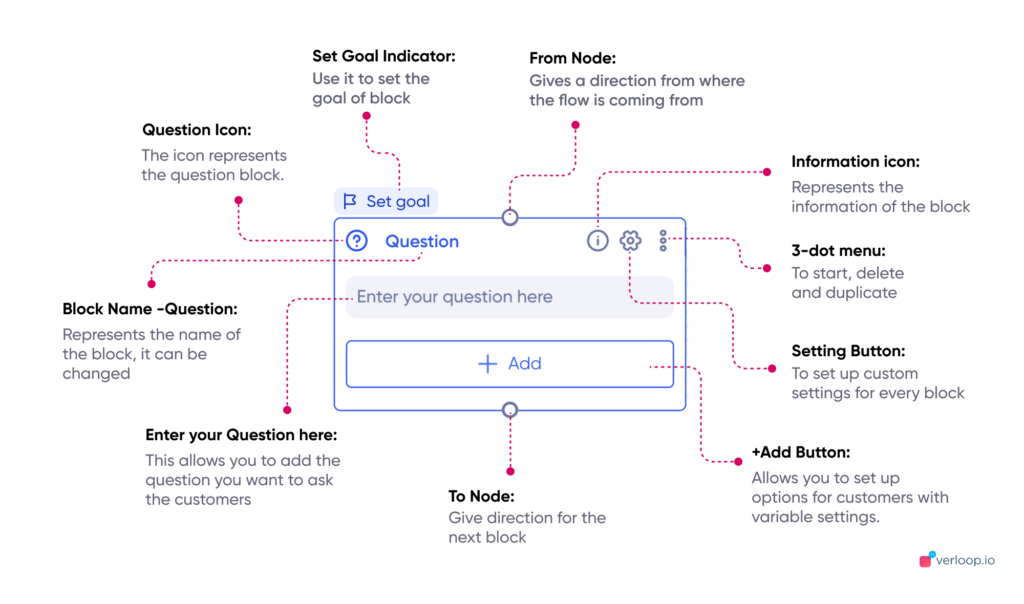
Note: You can use the 3 dot menu on top to start the recipe from this block, duplicate the block or delete the block.
4. Slider Block
A slider block is used to show multiple images/card to the user. You may use it to deliver your product catalogue in a horizontal scroll format, along with the text. Each image/card in the slider can have multiple buttons.
The buttons can lead the visitor to any block in your recipe. The bot waits for the response from the user before proceeding to the next block in the recipe.
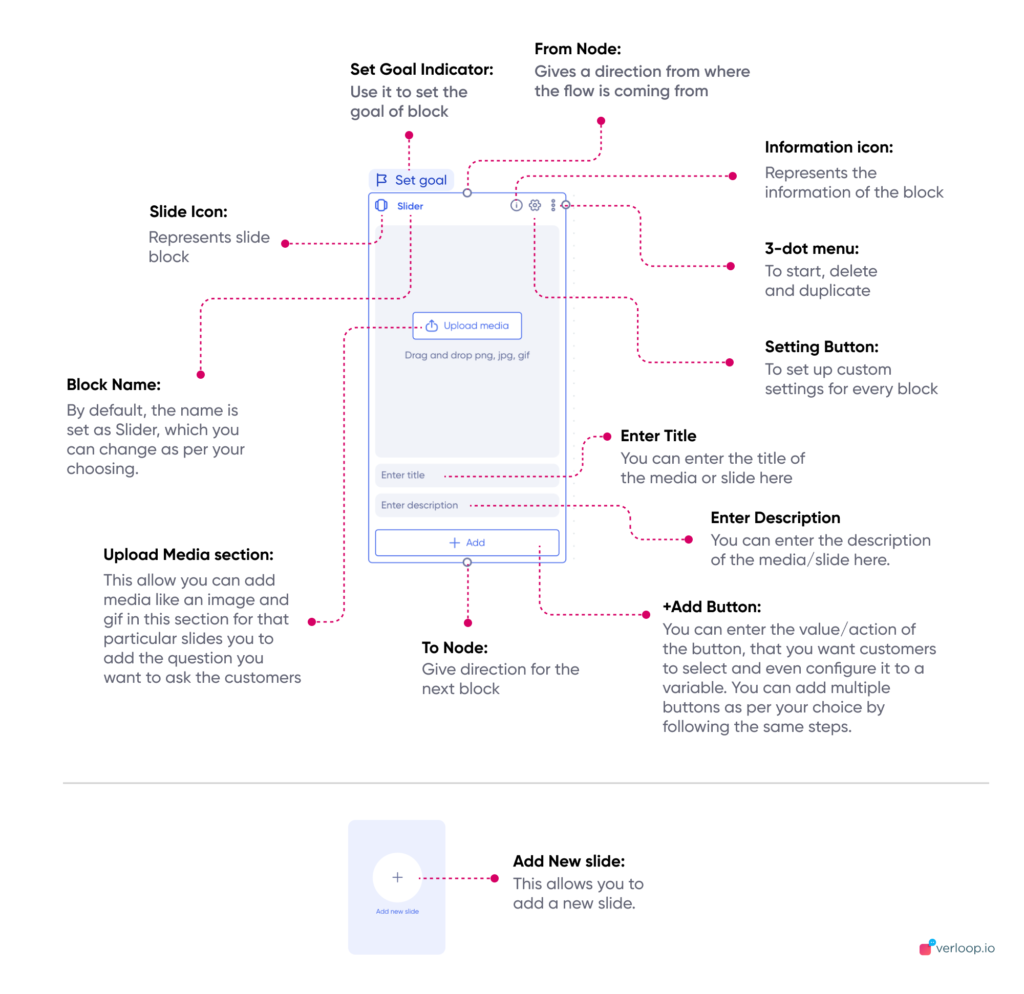
You can click on the Add new slide to add more media options.
Note: You can use the 3 dot menu on top to start the recipe from this block, duplicate the block or delete the block.
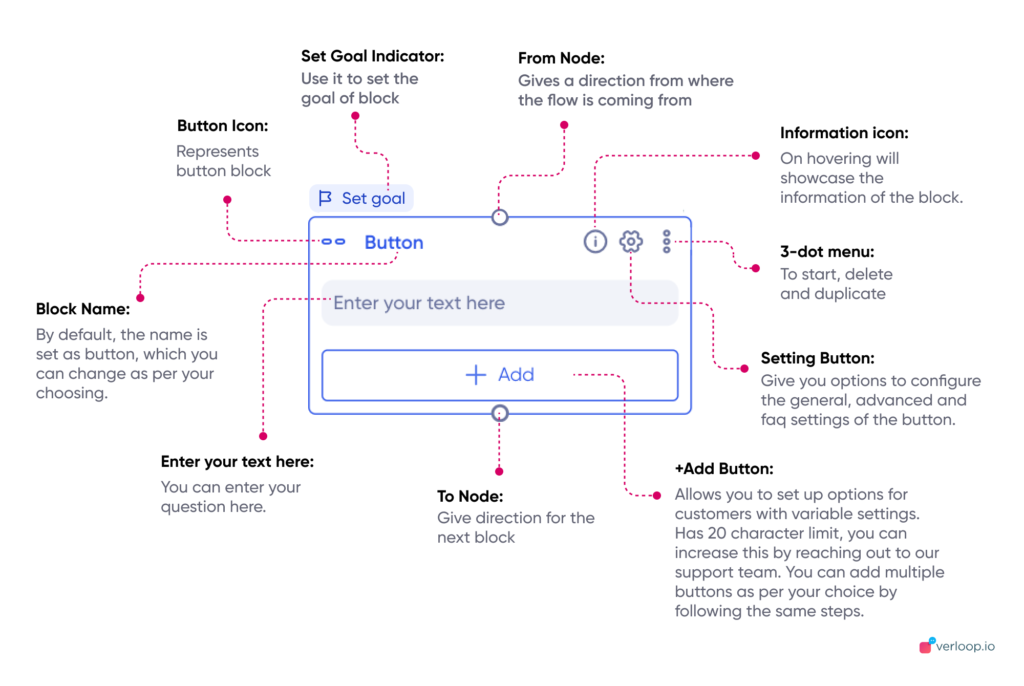
5. Buttons Block
Use Buttons to get quick replies from your visitor. You can save the response of the visitor to a variable. The bot waits till the user has clicked a button.
6. Transfer Block
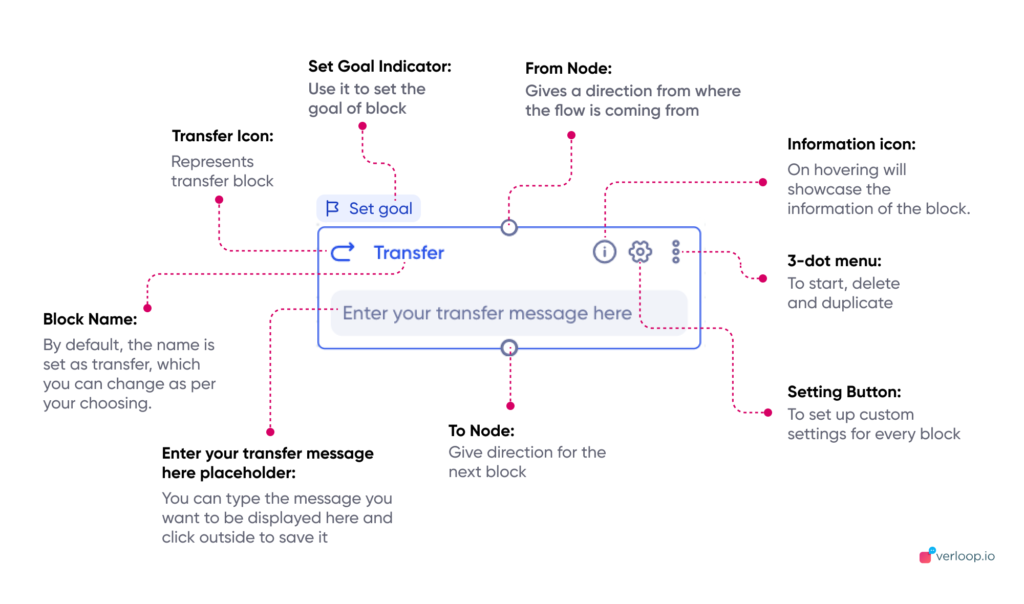
By choosing this block the chat will be transferred to one of your agents. You can set a default message whenever the chat is being transferred.
Note:
1. You can use the 3 dot menu on top to start the recipe from this block, duplicate the block or delete the block.
2. Transfer block offers you the settings to transfer the chat based on agent availability and specific departments.
7. Close Block
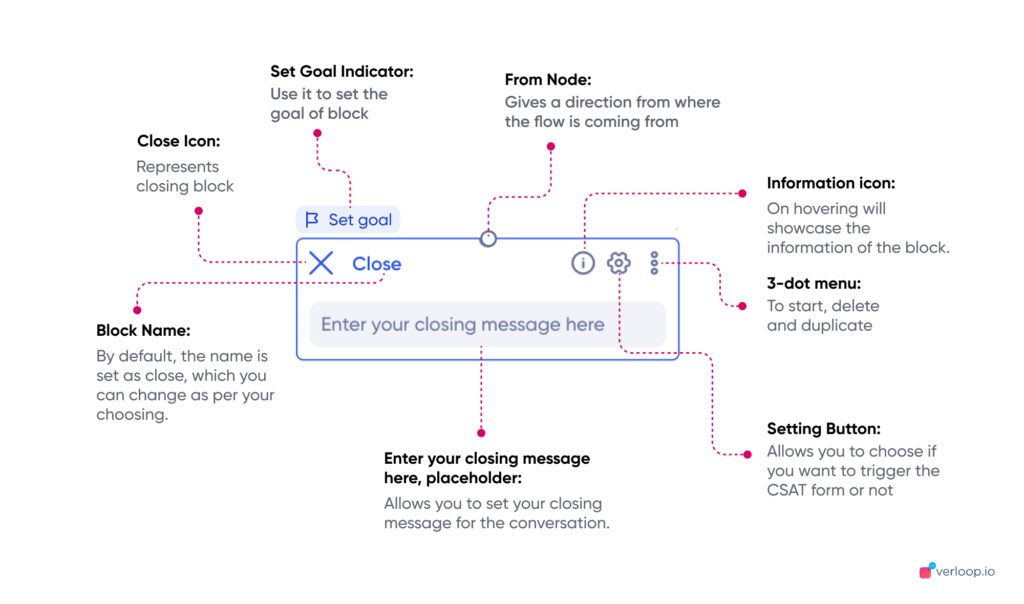
You might want your bot to close a chat based on the conversation. The bot can close the chat with a default message set by you. Typically this is used at the end of the recipe. But you can also close a conversation based on the actions of your visitor. For example, a button inside another block may lead to this block closing the conversation.
Note:
1. You can use the 3 dot menu on top to start the recipe from this block, duplicate the block or delete the block.
2. Close block offers you the setting option to initiate feedback/CSAT flow.
8. FAQ Block
The FAQ block in your recipe fields helps you answer repetitive questions from your customers. While you could always trigger your FAQ database using blocks like questions and sliders, they are limited in their capabilities. In addition, when the FAQ block is triggered, your customers are sent a message to inform them that the bot is fielding their questions, and are given a button for when they’re finished.
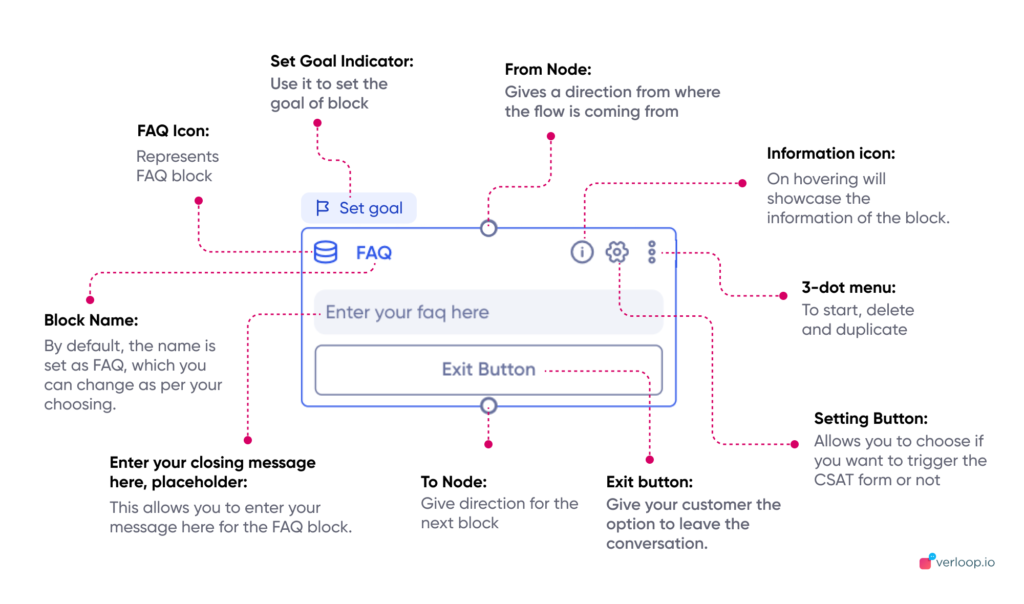
Note:
1. You can use the 3 dot menu on top to start the recipe from this block, duplicate the block or delete the block.
2. FAQ block offers you the setting option to initiate a default FAQ recipe
9. Webhook blocks
The Webhook block is one of the most powerful features of Verloop recipes. Using webhook blocks, you can tightly integrate the bot’s flow with your business logic.
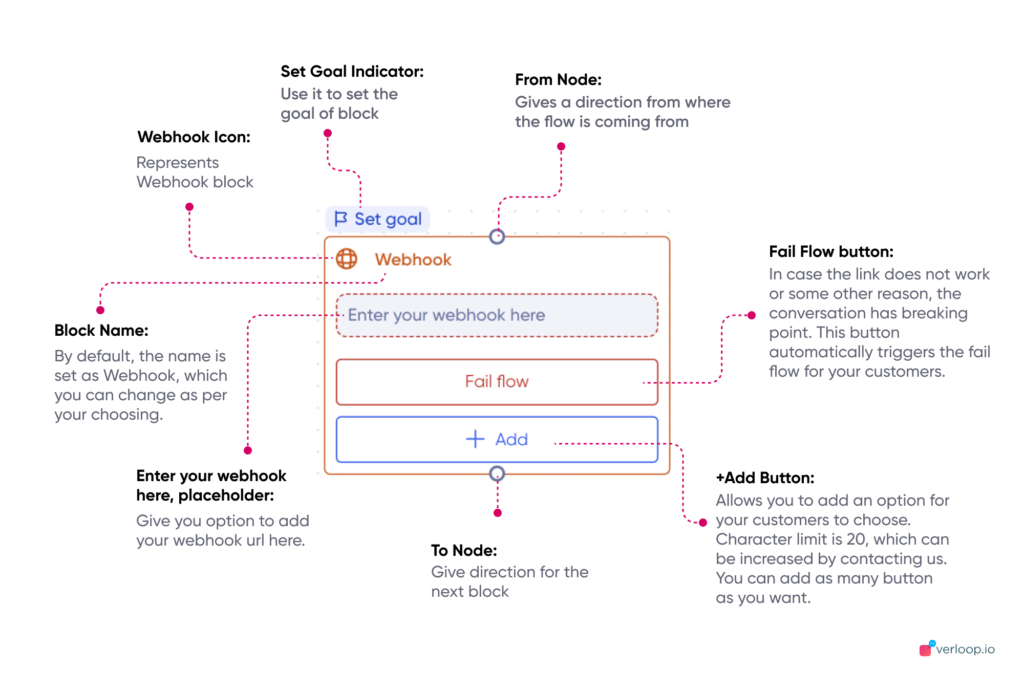
Note: You can use the 3 dot menu on top to start the recipe from this block, duplicate the block or delete the block.
10. List Block
List block is best to be used in a recipe when you want to showcase several options, such as customer care or FAQ menu, take-out menu, selection of nearby stores or locations, available reservation ties, and choosing a recent order to repeat, etc.
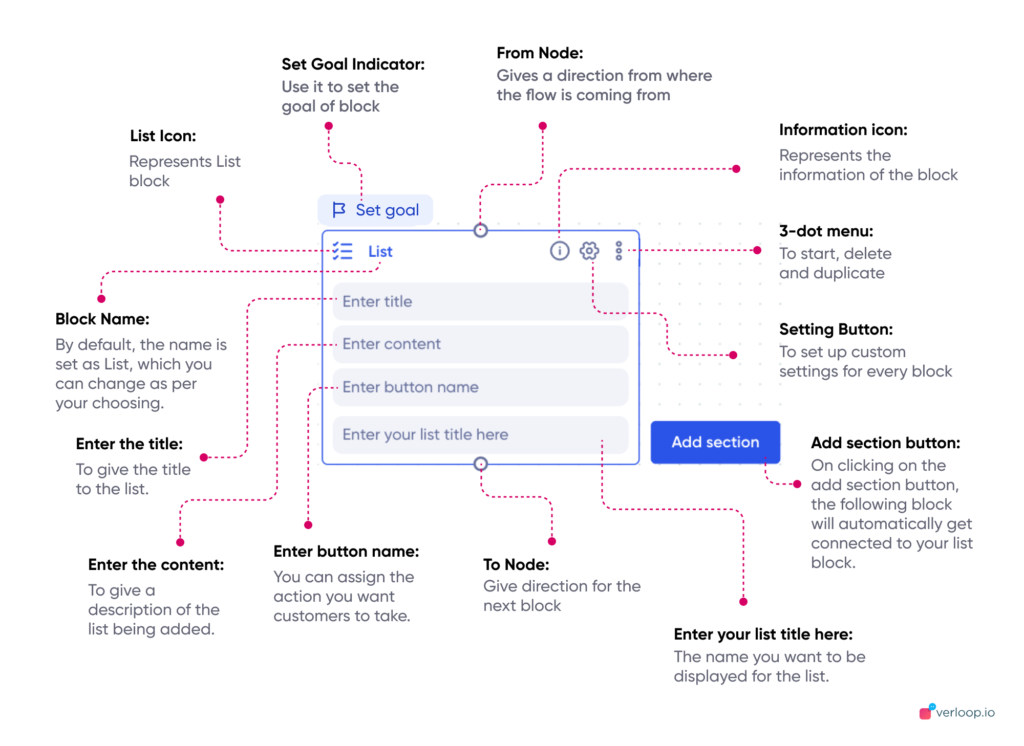
Note
1. You can use the 3 dot menu on top to start the recipe from this block, duplicate the block or delete the block.
2. Webhook block also offers you the same setting option as in Question block.
11. Catalogue block (only for WhatsApp)
This block in Verloop.io recipes allows businesses to showcase and sell products and services. And for customers, it’s easy to browse items and add them to a cart without leaving the chat. Businesses can showcase two types of messages:
1. Multi-Product Messages: Messages containing a selection of up to 30 items from a business inventory.
2. Single Product Messages: Messages with a single product item from the business inventory. The product is displayed in a Product Detail Page (PDP) format.
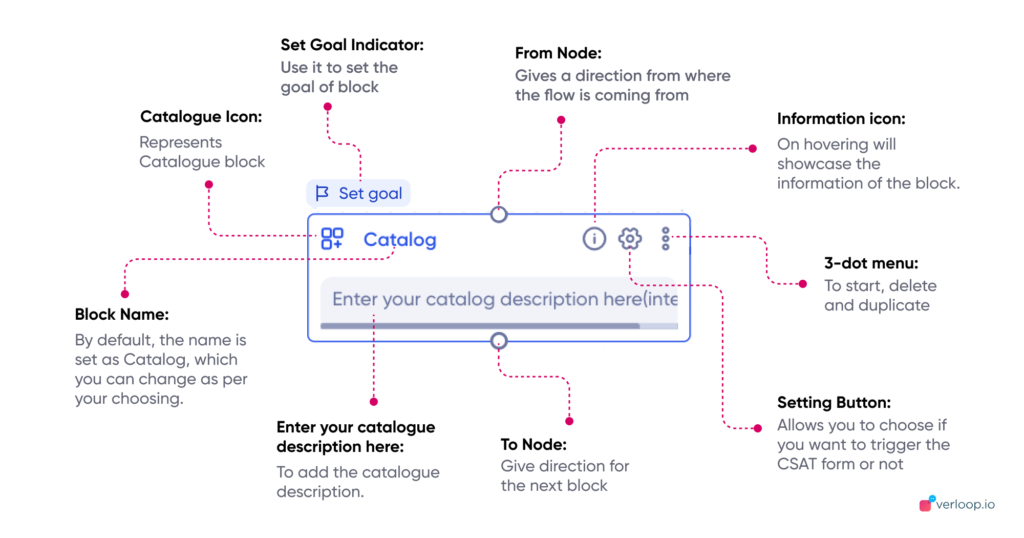
Note:
1. You can use the 3 dot menu on top to start the recipe from this block, duplicate the block or delete the block.
2. Catalogue block also offers you the setting option for general and faq settings. Click here to learn more: Catalogue Block
Note: You can set every block’s goals as required. Learn more about it here.
How to build your own Recipe?
You’d be forgiven for thinking that building a recipe would be an insurmountable task, that’d require effort and time. Not at all!
The Verloop.io team has made the process as intuitive and as easy as pie, so just follow these simple steps and you will have your first recipe ready in minutes. And you can continue to build on your progress, and make many more recipes in the future by following the same steps.
- The recipe icon on the platform will take you to the bot recipes.
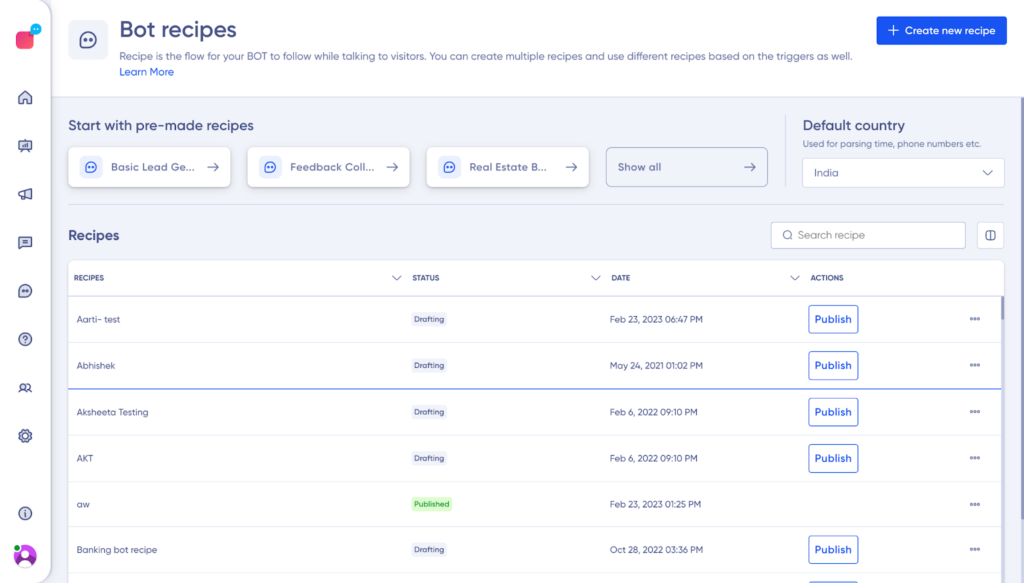
- Click the Create new recipe icon in the top right corner.
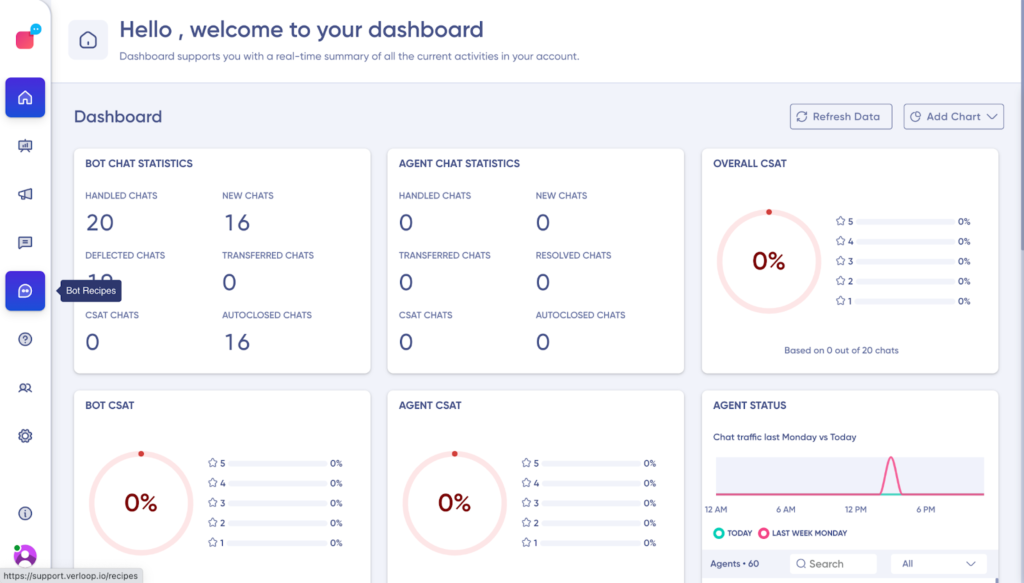
3. Create a new recipe button, to start creating a new bot flow from scratch.
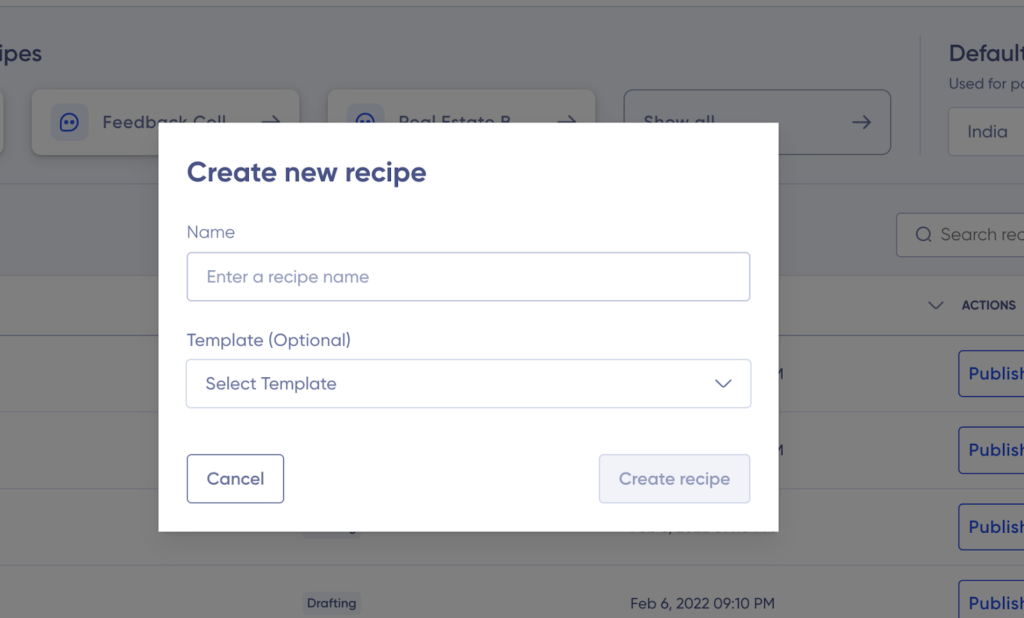
4. Choose a name for your recipe (you can change the name later, so don’t worry about it being fixed forever) and the template like:
a. Lead Generation
b. Feedback Collection
c. Real Estate
d. HR
e. Tourism
f. Banking
g. Online Contact
h. Recharge
i. Retail, etc.
5. Your recipe screen will open up. Start using blocks available in the block Toolbar on left side panel and add content to complete it.
6. Choose a welcome message for your visitors. It will pop up when your visitor fulfils your predetermined criteria. The time and place of the bot to prompt this message can be set by you, using triggers.
Note: You will see a Start Here button on top of the block, to give the command to initiate the recipe from here.
- Now it’s time for you to choose which block you want to pop up after the welcome message. You can choose from the existing blocks. Or, even create a new block.
- Repeat this process till you achieve the desired flow.
